Create a personal access token
A personal access token lets a desktop extension, SDK or script act as you with the permissions you choose. A scope is one allowed operation, such as searching documents. Resource limits determine where those operations may run. Both remain subject to your current role and access.
Use this guide for the Claude Desktop MCPB’s explicit PAT compatibility mode or a manually configured API client. A hosted OAuth connector uses a different sign-in flow and appears under Authorized applications; do not paste a personal token into an OAuth client-secret field.
1. Open the token page
- Sign in to your koinon installation with your own account.
- Open Library and select the workspace the integration should use. If you want a single existing file, select that file as well.
- Open your avatar menu in the top navigation and choose API tokens. You can also open Your account and select API tokens in its navigation.
- Choose Create a token. Check the displayed account and organization before filling in the form.
The standalone interface uses /account/tokens beneath its configured application base path. Prefer the avatar menu when your installation is hosted beneath a path or embedded in another product. You do not create your personal token in the administrator's provider settings.
2. Name it and set its expiry
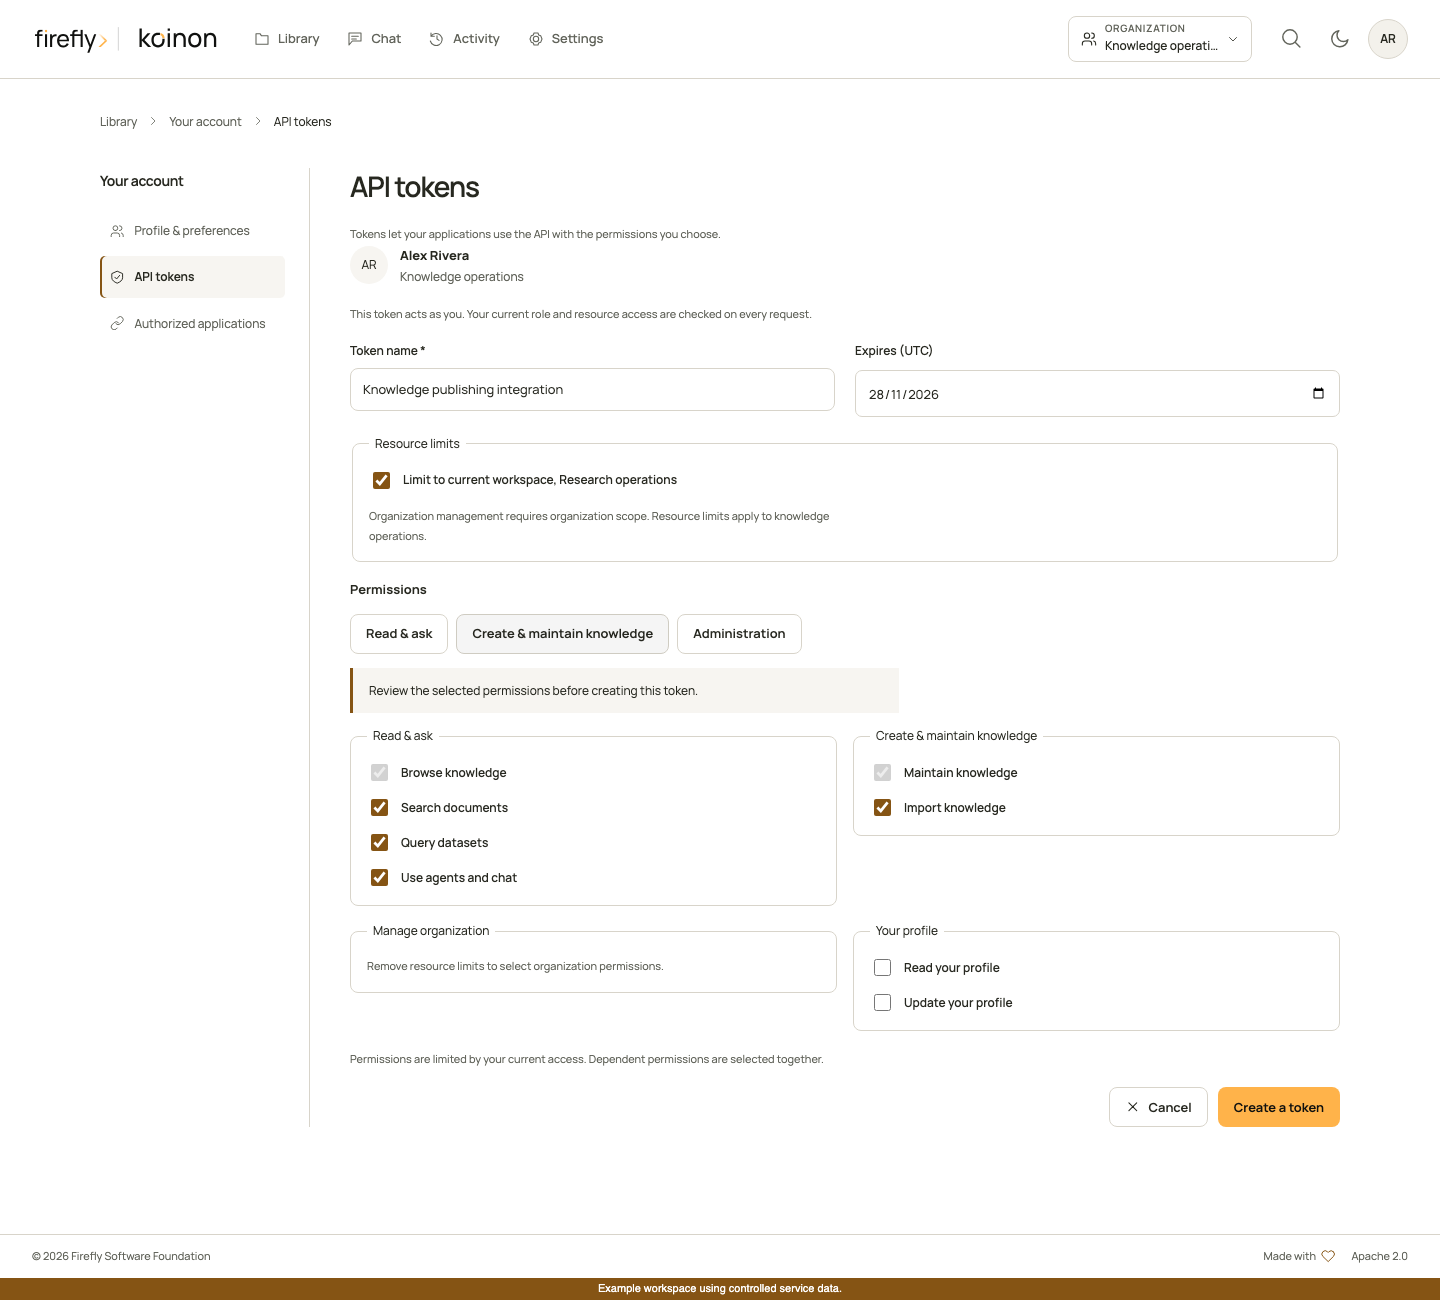
Use Token name to identify the application, for example Claude Desktop on my laptop. The name is a label, not the secret.
Choose a future Expires (UTC) date within the permitted lifetime. The form expires the token at the end of that date in UTC. Installation policy controls the maximum lifetime; the default is up to 365 days. Choose the shortest period appropriate for the integration. A token does not renew itself when used.
3. Limit the resources
Under Resource limits, keep Limit to current workspace selected for an integration that should use only that workspace. Confirm its displayed name. This option appears when a workspace was selected in Library.
Limit to selected file appears for a supported selected asset and narrows access further. A file-limited token cannot create arbitrary new upload destinations or access sibling files. For ingestion, use a workspace limit and an authorized destination inside that workspace.
If you cannot see the intended workspace limit, cancel the form, select the workspace in Library and start again. Do not leave the token unrestricted just to get past setup. An organization-wide token still cannot access resources your user account is not permitted to use.
4. Choose the permissions
The Read & ask, Create & maintain knowledge and Administration buttons select groups of available permissions. They are starting points: review the individual checkboxes before creating the token. Administration removes resource limits and selects available organization permissions, so it is not the right preset for an ordinary desktop knowledge connection.
For Claude Desktop, select permissions according to the tasks you need:
| Task | Checkbox labels | Scope identifiers |
|---|---|---|
| Browse and read sources | Browse knowledge | catalog:read |
| Find relevant document passages | Browse knowledge, Search documents | catalog:read, knowledge:search |
| Query structured datasets | Browse knowledge, Query datasets | catalog:read, query:execute |
| Organize ordinary folders and metadata | Browse knowledge, Maintain knowledge | catalog:read, catalog:write |
| Stage and review content or file ingestion | Browse knowledge, Maintain knowledge, Import knowledge | catalog:read, catalog:write, ingest:write |
Keep search or query permissions as well when a proposed update needs supporting evidence. The form selects required dependencies together; an unavailable permission may reflect your current role or resource restrictions. Token creation cannot promote you to administrator or grant access to another space.
Content publication still needs explicit human approval in a compatible review component. Giving a token write permission does not authorize an assistant to approve its own proposal. For the full scope and role mapping, see API permissions and writes.
5. Create and copy the secret once
Choose Create a token. The next panel says Copy this token now. It will not be shown again. Select Copy token, then save it in a password manager or paste it into your integration's protected credential field. For the Claude Desktop extension in pat mode, that field is Personal access token.
Choose Done when it is stored. The token list retains the name, expiry, prefix and permissions, but not the recoverable secret. If you close the panel before saving it, revoke that token and create a replacement. The visible prefix is not sufficient to authenticate.
Never paste the token into a conversation, a source document, a URL or a repository. You can create separate tokens for separate integrations so that revoking one does not interrupt the others.
6. Verify, replace or revoke it
Ask the connected client to call koinon_context, then retrieve a known source inside the permitted workspace. Confirm the result against Library. A 401 indicates a missing, invalid, expired or revoked credential; a 403 calls for checking current permissions and resource limits.
To replace an expiring token, create a new one, update the client's protected settings, verify it and then revoke the old token. There is no edit-in-place action that extends a token's expiry or broadens its saved scopes. If a credential was exposed, revoke it immediately.
To revoke one, return to API tokens, locate it by name, choose Revoke and confirm the action. The interface warns that applications using it will lose access. A new operation with the revoked token must fail. Disabling the client alone is not server-side revocation.