Start here: choose your path
Use this page to find where to begin. In about ten minutes you will know the four pieces of Weave, which guides to follow for your role, and how a workflow goes from an idea to a running case. You need nothing installed to read it.
Weave is a durable workflow orchestration and integration platform with human tasks. You describe a business process once; Weave runs each case of it, waits for people and events, calls your systems, and keeps a history of everything.
Coming from a BPM suite? Weave covers the core of business process management, but it is not a BPMN engine. Read Coming from BPM/BPMN to translate service tasks, user tasks, gateways, and timers into Weave steps.
1. Understand the four pieces
Think of an order approval: receive an order, check it, ask a manager to approve it, and notify the customer. Weave remembers where each order is while your systems and people do the work.
| Piece | Plain-language meaning | Order example |
|---|---|---|
| Workflow | A versioned description of the steps, their data, and their decisions | Check the order → ask for approval → notify the customer |
| Platform | The running Weave server that stores workflows, starts runs, and reports progress | Your product asks it to start a run for order 123 |
| Integration code | A built-in connector or your own worker that calls another system | Call the warehouse or the notification service |
| PostgreSQL | The platform's durable memory | Order 123 keeps waiting for approval even if the server restarts |
Clients send requests to the platform: the weave CLI, Studio (the visual
editor), the Python SDK, or your own product over HTTP. Installing a client does
not start a platform, just as installing a database client does not start a
database server. People sign in through your organization's identity provider;
the local development platform uses Keycloak. Weave's own grants then decide what
each person may do.
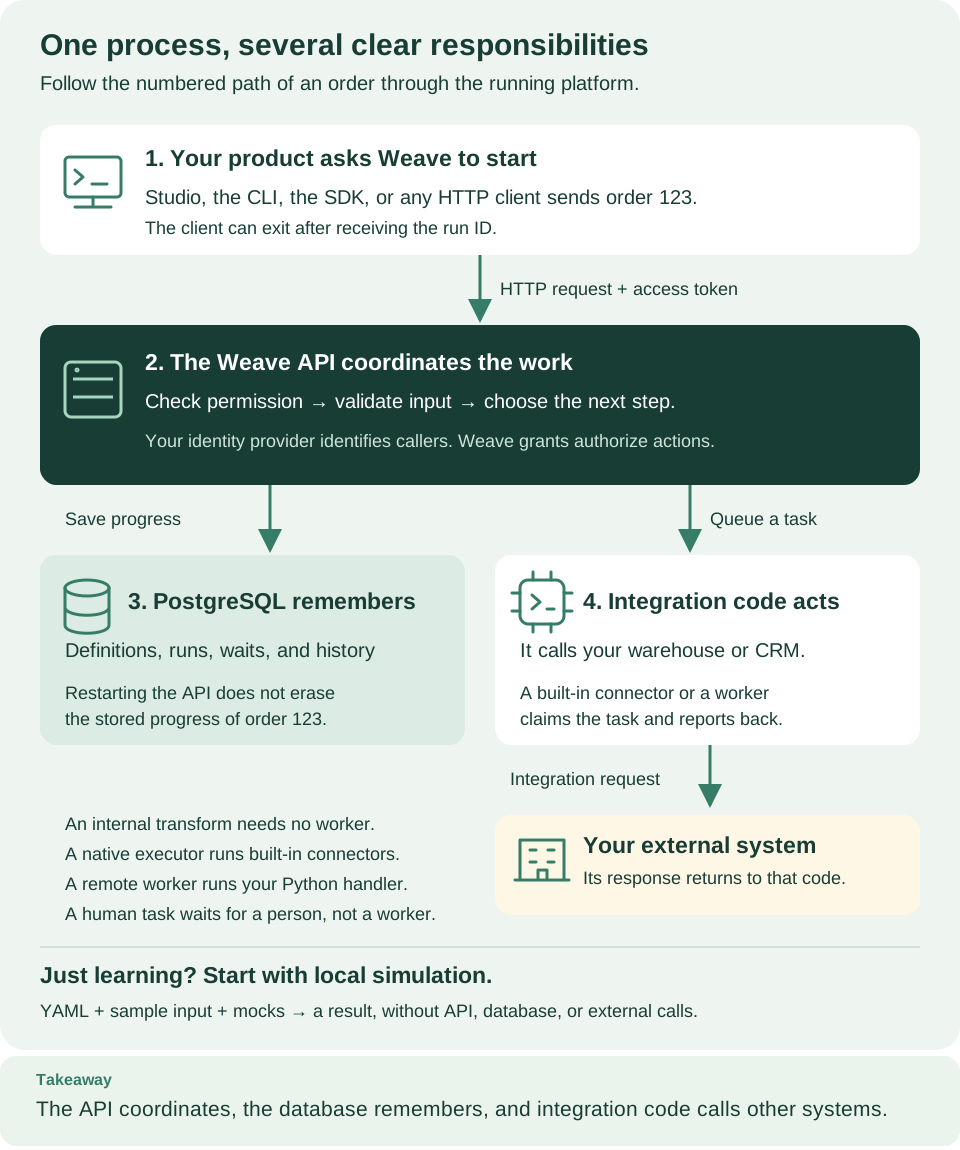
Follow the numbered boxes from your product's request (1) through the platform (2) and its database (3) to the integration code (4). The bottom band shows the shortcut for learning: a local simulation needs no platform at all. Open diagram at full size
2. Choose the path for your role
Pick the role closest to your work and follow its steps in order; stop when you have what you need. One person often has several roles, especially on a laptop. Who does what explains the roles and the permissions each one needs.
Every path starts with the v0.1.0a14 release. Install the CLI
first. The release includes everything these paths use: the Studio editor and
its API action builder, saved platforms (weave auth setup), REST calls without
code, and weave platform user.
Process designer or business analyst
You draw processes, add approvals and API calls, and run them.
What you need: the CLI and Studio's browser application, or the desktop app, and, from step 4 on, a platform: your team's server address and an account, or a local platform, which needs Docker.
| Step | Read | You finish with |
|---|---|---|
| 1 | Concepts, including Coming from BPM/BPMN | The vocabulary: workflow, step, activation, run, and how BPMN ideas map to them |
| 2 | Your first workflow | A workflow validated and simulated on your computer, with no platform |
| 3 | Install Studio, then draw your first workflow | A process drawn in the visual editor and checked as you edit |
| 4 | Start a local platform, its steps 1 to 8, or connect Studio to your team's platform | A platform where you can publish, run, and approve; on the local platform, create your person with every role, as its step 5 explains |
| 5 | Step reference | The right properties for each kind of step |
| 6 | Human tasks | An approval assigned to real reviewers; a task manager creates the reviewer binding with the CLI |
| 7 | Call a REST API from a step | A step that calls an API with no connector code; the operator prepares the environment once (details) |
| 8 | Save, publish, activate, and run | A run you start, approve in My tasks, and follow in Runs |
Integration developer
You connect workflows to APIs and systems, and build connectors or workers.
What you need: the CLI, and a platform: your team's server, or a local platform with Docker.
| Step | Read | You finish with |
|---|---|---|
| 1 | Connect the CLI to a platform | A saved platform, your sign-in, and a workspace |
| 2 | Author workflows | A workflow checked, compiled, and simulated with mocked results |
| 3 | Publish and run with the CLI | A published, activated workflow and a saved run |
| 4 | Call a REST API without code | An Action on the built-in HTTP connector, run from a workflow |
| 5 | Python SDK tutorial | A workflow built, published, and run from Python |
| 6 | Build a custom integration, then author a connector | A connector package tested offline; running it needs a deployed platform with a native executor |
| 7 | Workers | Your own task handler, admitted and claiming work |
| 8 | Run in a CI pipeline | A pipeline that starts and checks runs without a person signing in |
Administrator
You install the platform, configure sign-in, and give people access.
What you need: the CLI and Docker to practise locally; later, a cloud account or a Kubernetes cluster, your identity provider's administration, and a database administrator. Planning Microsoft Entra ID? It has verified application-token checks in Azure preproduction, but browser and device-code sign-in for people remain unverified; read the requirements before you deploy.
| Step | Read | You finish with |
|---|---|---|
| 1 | Start a local platform | A practice platform on your laptop, with a person who signs in |
| 2 | Identity and secrets, steps 1 to 4 | Your identity provider's clients, the API's trust profile, and the sign-in settings people use |
| 3 | Remote deployment, stages 1 to 5 | The API on your infrastructure, with one verified run |
| 4 | Make your own account a platform administrator | Your own account, instead of the host application, as administrator |
| 5 | People and access, starting with your team's workspace | A workspace, and people linked to their accounts with scoped roles |
| 6 | Verify one person end to end | A test person who connects and sees the expected workspace |
| 7 | Configuration | Every server and client setting in one place |
Operator
You keep runs healthy, resolve incidents, and maintain the platform.
What you need: the CLI connected to the platform, with viewer and
operator in the environment, operator on the project for compatibility and
retention, and execution_manager to purge runs. On a local platform, create
your person with --role tenant_admin --role operator --role viewer --role
execution_manager, then grant operator on the project as in
People and access.
| Step | Read | You finish with |
|---|---|---|
| 1 | Connect the CLI to a platform | A saved workspace with the roles above |
| 2 | Manage runs and business cases | Runs found by business key, archived, or purged one at a time |
| 3 | Incident operations | A suspended run resolved deliberately, cancelled, or retried |
| 4 | Troubleshooting and history and replay | A symptom traced to the failing boundary |
| 5 | Observability | Metrics and traces in your collector |
| 6 | Upgrades and backup and restore | A rehearsed upgrade and restore |
| 7 | Retention | A reviewed plan that removes expired debug sessions |
Steps 5 and 6 need a platform you start without weave platform: the local
platform cannot export telemetry, and the backup helper refuses it. Rehearse on
the manual local installation, or on your
deployment.
Only approving tasks? Ask your administrator for access, connect Studio, and open My tasks; see Complete human work.
Just exploring? Run the quickstart for the language, the local platform for a real server, or the API playground to send requests from a browser.
3. Learn the lifecycle with one example
Every workflow goes through the same steps, whether you use Studio, the CLI, or the SDK:
- Write: describe the process in YAML or JSON, with the Python SDK, or by drawing it in Studio.
- Validate: catch invalid fields, expressions, and missing dependencies.
- Simulate: try sample input with mocked external results; nothing real is called and no run is saved.
- Publish: save an immutable version on the platform.
- Activate: select that version for an environment, with the connections, releases, and reviewers it needs there.
- Run: send one input. The platform returns the ID of this run.
- Inspect: read the run's state, output, history, or incident.
Editing a file changes nothing on the platform. Publishing creates a version. Starting a run creates one execution of an activated version. These are three separate actions. The CLI tutorial performs each one, and Studio's designer offers each in turn as its main button: Save draft, Publish…, Activate…, then Start run….
4. Know where a command runs
Each tutorial says which terminal and directory to use. Keep using the same
shell while you follow a numbered sequence, because shell variables belong to
that shell. A line that starts with # is a comment explaining why the next
command is there; you can paste it along with the command.
# Ask the installed client for help; this does not start any services.
weave --help

# Print the link to the platform guide.
weave docs platform
Expected: the command overview, then the address of the platform guide.
A command that keeps printing server logs is still running. Leave that terminal open and use a second terminal for client commands. Ctrl-C stops the server in the foreground. The local platform guide explains how to stop its containers while keeping the saved data.
5. Understand "local platform" and "remote deployment"
The local platform runs PostgreSQL and Keycloak in Docker containers, plus the Weave API on your laptop. It is enough to develop and test real workflows. It is not a Kubernetes cluster or a high-availability setup.
A remote deployment runs the API and worker containers on your infrastructure, often Kubernetes. A registry stores the images, PostgreSQL stores the business state, and your identity provider issues tokens. A remote worker needs only a reachable API and its own credentials, never the database. The remote deployment guide gives an ordered route through AWS, Azure, or Google Cloud.
When something goes wrong
Read the first failing step and its expected result before you continue.
| What you see | Why | What to do |
|---|---|---|
A diagnostic with a WV-COMP-… code |
The definition needs a change | Fix the field at the reported path, then validate again |
| HTTP 401, or "sign in" in the message | You are not signed in, or your sign-in expired | Run weave auth login, or sign in again in Studio |
| HTTP 403 | You are signed in, but your role does not allow this operation | Ask your administrator for the right grant in that workspace |
| A run keeps waiting at an integration step | No executor or worker has claimed its task | Check that the connector or worker release is activated, admitted, and running; weave workers list --output json (needs viewer) lists registered workers |
| A run is suspended | An incident needs an operator's decision | Follow incident operations |
The troubleshooting guide connects more symptoms to checks you can perform.
Next steps
- Concepts: the ideas behind every guide, with a glossary.
- Who does what: roles, permissions, and the lifecycle in detail.
- Your first workflow: write, validate, and simulate a workflow on your computer.
- Architecture: follow one run through the platform's modules.