Deploy, start, and use the platform
Use this page to decide what you need to install and run, before you follow a step-by-step guide. It is written for administrators and for developers who want a real platform on their laptop. It takes about ten minutes to read; you only need the installed CLI to try the commands.
Installing weave gives you a client. A running platform also needs the
Weave API, a PostgreSQL database, and an identity provider that signs people in.
Who does what explains the people and roles involved.
Choose your starting point
| Your situation | What you install or run | First guide |
|---|---|---|
| I want to try a workflow on my laptop | The CLI only; local files and simulation | Your first workflow |
| I want to draw workflows visually | Studio in your browser, or the desktop app; you draw and validate locally, and connect to a platform to simulate, publish, and run | Studio |
| My team already runs Weave | The CLI or Studio, and the server address from your administrator | Connect the CLI or connect Studio |
| I need my first complete platform | The CLI, a matching source checkout, uv, and a local Docker engine |
Start a local platform |
| My workflow calls a REST API | The local platform with its built-in HTTP connector enabled, or an environment your operator prepared | Call a REST API without code |
| My workflow runs my own integration code | The working platform plus an admitted worker image and handler | Worker and container deployment |
| I need a shared installation in the cloud | Prepared infrastructure, registry images, PostgreSQL, HTTPS identity, and Kubernetes | Cloud deployment |
For your first platform, follow Start a local platform. It ends with a saved, successful run and a person who can sign in, before you add workers or cloud infrastructure. A local simulation is useful for learning the language, but it creates no server and no saved run.
Understand what stays running
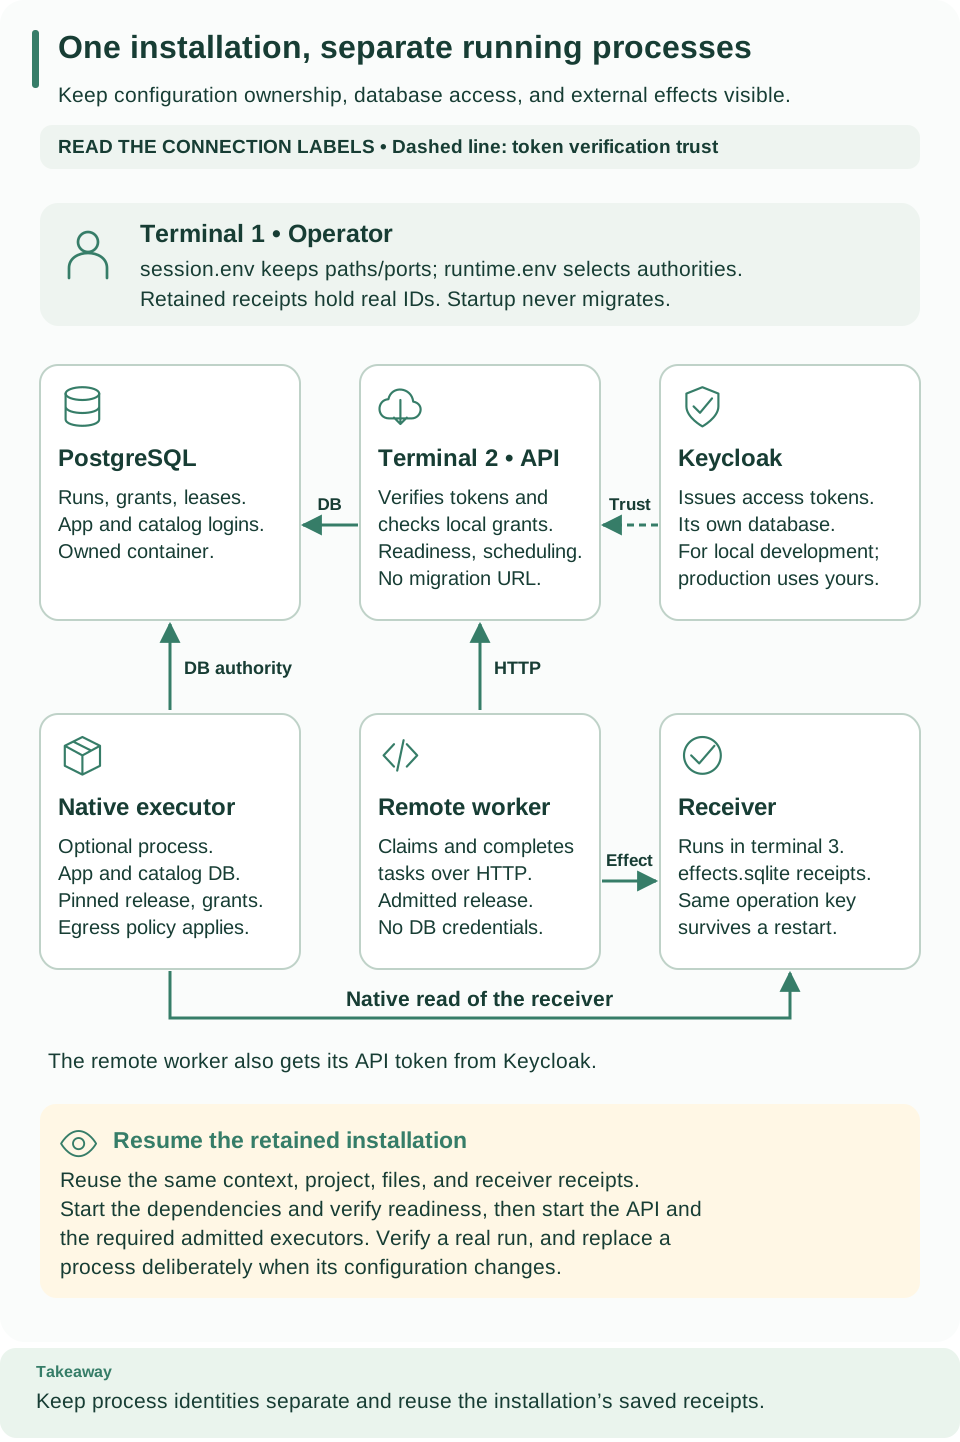
Read the diagram from the top: terminal 1 is where you run setup and client
commands, and the middle row is what your first run needs: the API in terminal 2,
with PostgreSQL and Keycloak in containers beside it. The lower row (native
executor, remote worker, and a test receiver in terminal 3) is optional and comes
later. The diagram follows the manual setup; the weave
platform commands run the same processes for you, with one difference: the API
runs in the terminal where you ran setup and start, and client commands go
in a second terminal.
Open diagram at full size
| Component | Why it exists | Needed for the first saved run? |
|---|---|---|
weave CLI, Studio, or Python SDK |
Sends requests and shows results | Yes, to start the run; it can exit afterward |
| Weave API | Checks permissions, stores definitions, starts runs, and schedules work | Yes; keep it running |
| PostgreSQL | Keeps workflow state, grants, task leases, and history | Yes; the local platform creates its own database |
| Identity provider | Signs people in and issues the tokens the API verifies | Yes; the local platform runs Keycloak in its own container |
| Native executor | Runs connector Actions, such as the built-in HTTP connector, inside the API process or a separate container | Only for workflows that call connector Actions |
| Remote worker | Claims tasks over HTTP and runs your own handler | Only for workflows that use your own task handlers |
| External service | Receives the integration's real requests | Only for integrations |
The API also schedules timers, waits, and lease recovery in the background, using a separate database login; you do not run a separate scheduler. A remote worker needs API credentials and grants, never database credentials. The configuration guide lists every process's settings.
Keep client installation and server startup separate
weave --help runs the installed client and returns to your shell. It starts no
server. weave init DIRECTORY creates a local workflow project, and weave docs
platform prints the link to this page. Neither provisions databases, identity,
or containers.
The weave platform commands manage one local development platform. Run them
from a source checkout that matches your CLI, because the Compose files and
setup helpers are part of the repository:
| Command | What it does |
|---|---|
weave platform doctor |
Checks the checkout, uv, and Docker without changing anything |
weave platform setup |
Creates the private configuration, the databases, Keycloak, and the server environment, once |
weave platform start |
Starts the containers and runs the API in this terminal; Ctrl-C stops the API |
weave platform status |
Shows the setup stage, API and identity readiness, and the URLs |
weave platform demo |
Creates a demo workspace and saves one real, successful run |
weave platform user |
Creates a development person who can sign in to the CLI and Studio |
weave platform integrations |
Enables the built-in HTTP connector's actions in the demo environment |
weave platform secret |
Stores development secret values behind handles for connections |
weave platform token |
Refreshes the local host token, which works with the local API and its /docs page |
weave platform stop |
Stops this installation's containers after Ctrl-C, keeping all data |
user, integrations, and secret are new in 0.1.0a7. An alpha6 or
earlier CLI and checkout do not have them; weave platform --help lists them
when they are available.
weave worker deploy --target compose starts a prepared worker container on
a local Docker engine. Cloud infrastructure and Kubernetes use the procedures in
the cloud deployment guide.
Inspect the manual setup steps
weave platform setup automates these stages. Follow the
manual local walkthrough instead when you want to see and
control each operator action, for example before you deploy to your own
infrastructure. You need Python 3.12+, Git, uv, a running local Docker engine
with Compose 2.30 or newer, Bash or Zsh, and the release checkout selected in the
prerequisites. A client-only installation does
not include the setup scripts.
| Step | Action | Ready to continue when… |
|---|---|---|
| 1 | Select the local engine, private work directory, and server artifact | The selected Python reports its installed Weave version |
| 2 | Create PostgreSQL and Keycloak, then migrate the runtime database | Identity discovery succeeds and the schema is current |
| 3 | Verify the host identity and bootstrap its link | A private bootstrap receipt contains the real principal ID |
| 4 | Start the API in terminal 2 | Terminal 1's readiness check prints API is ready |
| 5 | Create the workspace and grants, publish, activate, and run | The saved run succeeds with {"message": "Hello, Weave"} |
| 6 | Use the CLI to publish your own workflow | You can start a run and inspect its history through the API |
The manual route installs the server into its own Python environment, records
that interpreter as WEAVE_PYTHON, and runs operator commands as
"$WEAVE_PYTHON" -I -m firefly_weave.cli.main. Your user-level weave command
stays a separate installation. The API itself is
firefly_weave.main:create_application, launched through Uvicorn with the
environment that the walkthrough prepares; starting it without that
configuration is not a complete installation.
New terminals do not inherit variables you exported elsewhere. The manual setup
prints exact cd and source .../session.env commands: save and reuse them.
session.env restores paths and ports only; load the private runtime or
identity files only where a step tells you to. A receipt is a private file
that holds real IDs returned by setup or the API. Later steps read those IDs, and
an invented UUID never creates permission.
Use the running platform
A durable workflow follows this sequence:
- Connect: save the platform and sign in, with
weave auth setupor from Studio. On the local platform, create a person first withweave platform user. - Author and validate: write or draw the workflow and check it.
- Publish: save an immutable version in your project.
- Activate: select that version for an environment, with its connections, releases, and reviewers.
- Run: send an input to that activation.
- Inspect: read the run's output, history, or incident.
The CLI tutorial performs each step from the terminal. In Studio, the designer's main button moves through Save draft, Publish…, Activate…, and Start run…, and Runs shows each run. The SDK reference shows the same operations from Python.
A workflow that calls your own code also needs its handler packaged, its release admitted, its worker granted, and the worker started; see the deployment guide. Publishing a workflow does not start a worker, and building a worker image does not let it claim tasks.
Stop and resume without repeating setup
With the weave platform commands: press Ctrl-C in the API terminal, then
run weave platform stop. Containers, volumes, credentials, and saved runs are
kept. Next time, run weave platform start again from the same checkout; it
never provisions or migrates again.
With the manual setup: stop the API with Ctrl-C, then use the scoped Compose stop command. If you added workers or a native executor, follow their shutdown order first, so every writer stops before its dependencies. To come back, follow resume this installation: restore the same session and secret files, start the same dependencies, check identity readiness, start the API, refresh the token, and read the existing run. Do not regenerate secrets, bootstrap again, or create the resources again.
If something does not work
| What you see | Why | What to do |
|---|---|---|
weave platform doctor reports a version mismatch |
The checkout and the CLI come from different releases | Use a checkout of the CLI's release, or point to one with --source |
A step of weave platform setup fails |
A prerequisite, a port, a Docker network, or disk space | See local platform troubleshooting |
| HTTP 401 | You are not signed in, or your token expired | Run weave auth login; for the manual setup, refresh the token |
| HTTP 403 | Your identity is not linked, or it lacks a grant in that workspace | Check the identity link and roles in People and access |
A worker container shows running, but nothing happens |
Running is not the same as being admitted and granted | Check the release, the grants, and a completed run, as in the deployment guide |
| A manual setup step fails | See that step's expected result | Use manual setup troubleshooting |
Cloud deployments have their own readiness and acceptance checks.
Next steps
- Start a local platform: the shortest path to a running platform.
- Connect the CLI to a platform: sign in and choose a workspace.
- Identity and secrets: connect your own identity provider.
- Remote deployment: move from your laptop to your infrastructure.