Design and run workflows in Studio
Studio is the visual workspace for Weave workflows. You can draw, import, and validate workflows on your computer without an account. When you connect to a platform, your team's Weave server or a local one, you can also save drafts, publish, run, and handle tasks. Studio uses the same compiler, API authorization, and durable runtime as the CLI and SDK.
Who this is for: process designers and business analysts who model processes, and anyone who approves tasks or watches runs. Developers use it to review what the CLI and SDK produce. What you need: Python 3.12 or newer and a terminal for the browser version, or the desktop app instead. Drawing needs nothing else; publishing and running need a platform and an account. Installing takes about 10 minutes, and a first workflow about 15. Coming from a BPM suite? Coming from BPM/BPMN translates BPMN terms into Weave steps.
The Studio page in your browser talks only to a small host that runs on your
computer at 127.0.0.1. That host keeps your saved platforms, which it shares
with the weave command line, and keeps your sign-in in the operating system's
credential store. The page never receives your tokens.
This page describes Studio 0.1.0a14. An alpha6 or earlier browser bundle shows an earlier connection assistant, which imports a login configuration file, and lacks the editor features and API actions described here. To follow this page, install the alpha14 browser application.
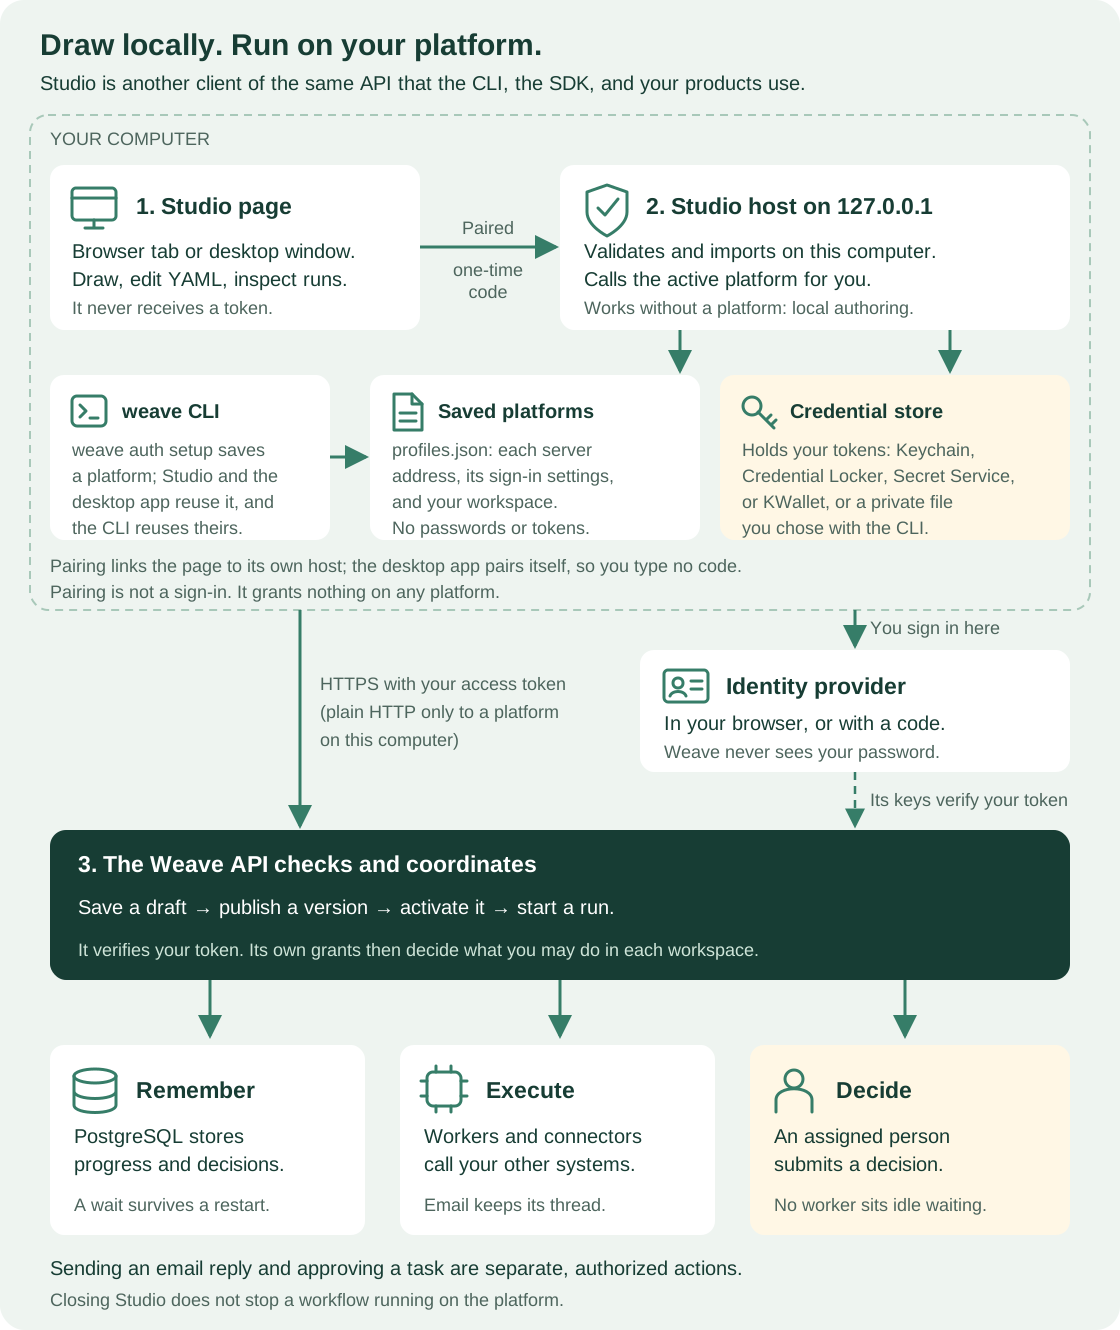
Follow the numbers: the Studio page (1) talks only to the paired local host (2), which calls your selected platform's API (3) over HTTPS. Everything below box 3 happens on the platform and keeps running after you close Studio. Open diagram at full size.
Choose what you want to do
| Your goal | What must be running | Start here |
|---|---|---|
| Open Studio as a native desktop app | A matching desktop build for your operating system | Install desktop |
| Draw, import, or validate a workflow on your computer | Studio's local host; no account | Install Studio, then work locally |
| Learn the editor with a small example | Studio's local host | Try it: draw your first workflow |
| Save and run workflows on your laptop | Studio plus a separate local Weave platform | Start the platform, then connect Studio |
| Work with your team's platform | Studio on your computer and the server address from your administrator | Connect to a platform |
| Call a REST API from a workflow without writing a connector | Connected Studio; an operator has prepared the built-in HTTP connector | Call a REST API from a step |
| Approve a task or inspect a run | Connected Studio with the relevant Weave grants | Complete human work and follow runs |
Studio is a client. Launching it starts a small local host and the editor. It does not provision PostgreSQL, an identity provider, workers, or a remote platform. Closing Studio does not stop runs already in progress on the platform.
Local authoring in the top bar means Studio is working with files on your computer. You can create, import, edit, and validate workflow definitions. Connect when you want to save them to a shared platform, run processes, or handle tasks. This status does not mean your computer has lost its internet connection.
Install the alpha14 browser application
Alpha7 includes the Studio host. Its browser assets are an optional, matching release bundle; the Python wheel does not embed the Angular application. Alpha4 does not include Studio. Download all files from the same v0.1.0a14 release. The CLI installer does not automatically fetch or install the Studio ZIP.
Use Python 3.12 or newer. The alpha14 CLI installer includes the Studio host and authentication dependencies, but downloads no browser ZIP automatically. These Bash/Zsh commands need neither Node nor a source checkout:
# Install the pinned CLI into its isolated installation directory.
# Review the installer first using the download-and-inspect alternative in Installation.
curl --fail --location https://github.com/fireflyframework/firefly-weave/releases/download/v0.1.0a14/install.sh \
  | sh -s -- --version v0.1.0a14
# Make the installed command available in this terminal.
export PATH="$HOME/.local/bin:$PATH"
# Check that the host version matches the browser bundle you will install.
weave --version

# Keep the downloaded optional browser bundle and its digest together.
mkdir weave-studio-alpha14
cd weave-studio-alpha14
curl --fail --location --remote-name https://github.com/fireflyframework/firefly-weave/releases/download/v0.1.0a14/firefly-weave-studio-0.1.0a14.zip
curl --fail --location --remote-name https://github.com/fireflyframework/firefly-weave/releases/download/v0.1.0a14/firefly-weave-studio-0.1.0a14.zip.sha256
# Verify the bundle on macOS. Stop if the check fails.
shasum -a 256 --check firefly-weave-studio-0.1.0a14.zip.sha256
# On Linux, use sha256sum --check in place of shasum -a 256 --check.

# Install only the bundle whose version and verified digest match this host.
weave studio install --bundle firefly-weave-studio-0.1.0a14.zip \
  --sha256 "$(awk '{print $1}' firefly-weave-studio-0.1.0a14.zip.sha256)"
# Start the local host without opening a browser automatically.
weave studio --no-browser
Expected: weave --version prints Firefly Weave 0.1.0a14, the checksum line
ends with OK, and the install prints Studio installed at PATH. Start it with:
weave studio. The host then prints Firefly Weave Studio · Local authoring (no
platform selected), or Firefly Weave Studio · Platform: NAME when a saved
platform is active, then Open http://127.0.0.1:8766 and a Pairing code:
line.
Open the printed loopback address and enter the pairing code, as described in
Pair the browser with the local host.
Leave the terminal running; Ctrl+C stops this host. After closing the terminal,
run weave studio again to launch the installed bundle.
An advanced wheel-only installation must explicitly select the studio extra
for this host, or client for API-only SDK use; see
installation. Installing Studio neither provisions nor
migrates a platform: for that, follow local platform setup
or the remote deployment guide.
Start from source
This route is for contributors, and for trying changes made after the
latest release; the release bundle above already has everything this page
describes. To reproduce the alpha14 release exactly, check out v0.1.0a14
instead; development main can differ from released assets.
From the repository root, install the development dependencies first. Node 24
and npm are required only for building the browser application.
Angular 22.2.1 is pinned in the application and package-lock.json fixes the
complete dependency graph.
# Create the locked Python environment, including optional features and docs.
uv sync --locked --all-extras --group docs

# Enter the browser application directory.
cd studio

# Install exactly the dependency versions recorded in the lockfile.
npm ci

# Compile the production application; this does not publish it.
npm run build

# Return to the repository root to use the Python development environment.
cd ..

# Serve only the freshly built browser assets on loopback.
.venv/bin/weave studio --assets studio/dist/studio/browser --no-browser
Expected: the host prints Firefly Weave Studio · Local authoring (no platform
selected), or Firefly Weave Studio · Platform: NAME when a saved platform is
active, then Open http://127.0.0.1:8766, a Pairing code: line, and Enter
this code in the browser. Press Ctrl+C to stop Studio. Keep the terminal running
while you use Studio.
Already installed a release browser bundle? Installed bundles are kept per
version, and a checkout can report the same version as the latest release, for
example 0.1.0a14. A plain weave studio then keeps serving the installed
release screens, and weave studio install keeps that bundle instead of
replacing it. Always start a source build with --assets studio/dist/studio/browser.
A source build can also package its browser application as a bundle and
install it by digest, so you no longer need --assets. This works only when no
bundle for the same version is installed yet:
# Package the built application; prints the SHA-256 and the bundle path in dist/.
.venv/bin/python scripts/build_studio.py
# Install the bundle generated for this exact Weave version.
# Replace both placeholders with the bundle path and SHA-256 printed above.
.venv/bin/weave studio install --bundle /path/to/weave-studio.zip \
  --sha256 YOUR_VERIFIED_SHA256

# Launch the installed bundle; Node and --assets are no longer required.
.venv/bin/weave studio --no-browser
Expected: Studio installed at PATH. Start it with: weave studio, then the same
startup lines as above. The installer checks bundle/version/digest compatibility.
Do not mix a source host with assets generated for a different version.
Pair the browser with the local host
Pairing proves that a browser window belongs to the person who started the
host. weave studio prints a one-time code in your terminal. Open the printed
address, type the code into Pairing code, and select Pair browser.
- The code works once, and only within five minutes of starting the host.
- A paired window stays paired for up to eight hours, including page reloads.
When the session ends, Studio says "Your Studio session ended" and asks you to
restart
weave studiofor a new code. - After 10 wrong codes, the host refuses every further attempt. Restart it.
- The desktop app pairs its own window automatically, so you never type a code. If its pairing page stays open, quit and reopen Firefly Weave Studio.
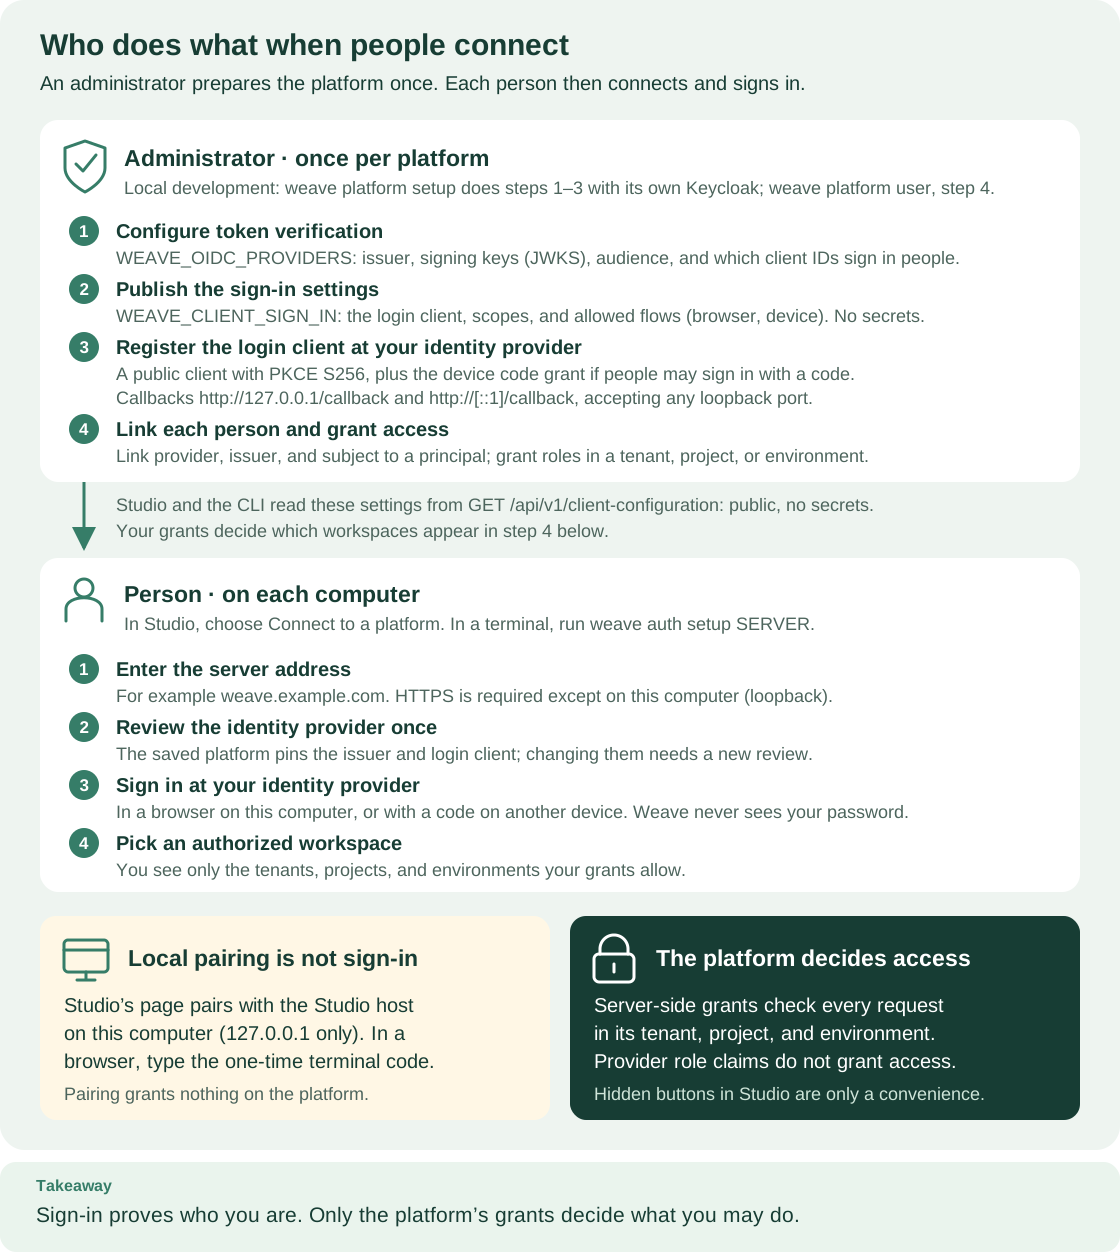
Pairing is not a sign-in. It grants nothing on any Weave platform and never reaches your identity provider. You sign in to a platform separately, in Connect to a platform. Pairing codes and tokens never appear in URLs. The sign-in roles diagram shows pairing next to the platform sign-in and the grants an administrator controls.
Work locally without signing in
The first time Studio opens with no saved platform, it asks How do you want to work? and offers two choices:
- Work locally: draw, import, and validate workflows on this computer. No account is needed. Studio remembers this choice and opens directly the next time.
- Connect to a platform: opens the connection assistant.
While you work locally, the top bar shows Local authoring and "Create and edit on this computer". You can create, import, and edit workflows, and Studio checks their structure, data references, and types as you type. Actions and connections are checked against a project catalog only after you connect. Studio keeps each workflow you edit in this browser and lists it on the On this computer tab of Workflows. In the designer, the main button is Save to file. This works without a platform. The nearby information button explains which operations need a connection and opens the connection assistant. Saving a shared platform draft, publishing, simulating, activating, and starting runs need a platform.
You can change how Studio starts. In Settings → Platforms, under
Starting Studio and When Studio opens, choose Ask how to work or
Start with local authoring. Studio asks only while no platform is saved. The
preference is kept in studio.json, next to your saved platforms.
Working locally keeps your platforms saved. Select Work locally at the
bottom of Settings → Platforms to stop using the active platform. Your saved
platforms and sign-ins stay, and Studio says "You're working locally. Workflows
stay on this computer until you connect to a platform." This also leaves the
weave command line with no active platform. To make one active again, select
Switch to this platform on its row in Settings → Platforms, or run
weave auth use NAME.
Connect to a platform
A platform is a Weave server that Studio has saved: its address, the sign-in settings you reviewed, the sign-in methods your administrator allows, your chosen workspace, and the last account name. Before you start, you need:
- The server address from your administrator, for example
https://weave.example.com. - An account at your organization's identity provider. You type your password only on the identity provider's own sign-in page, never in Studio.
- An administrator who has published the server's sign-in settings, linked your account, and granted you a role in a workspace. The administrator's side is in What your administrator does and People and access.
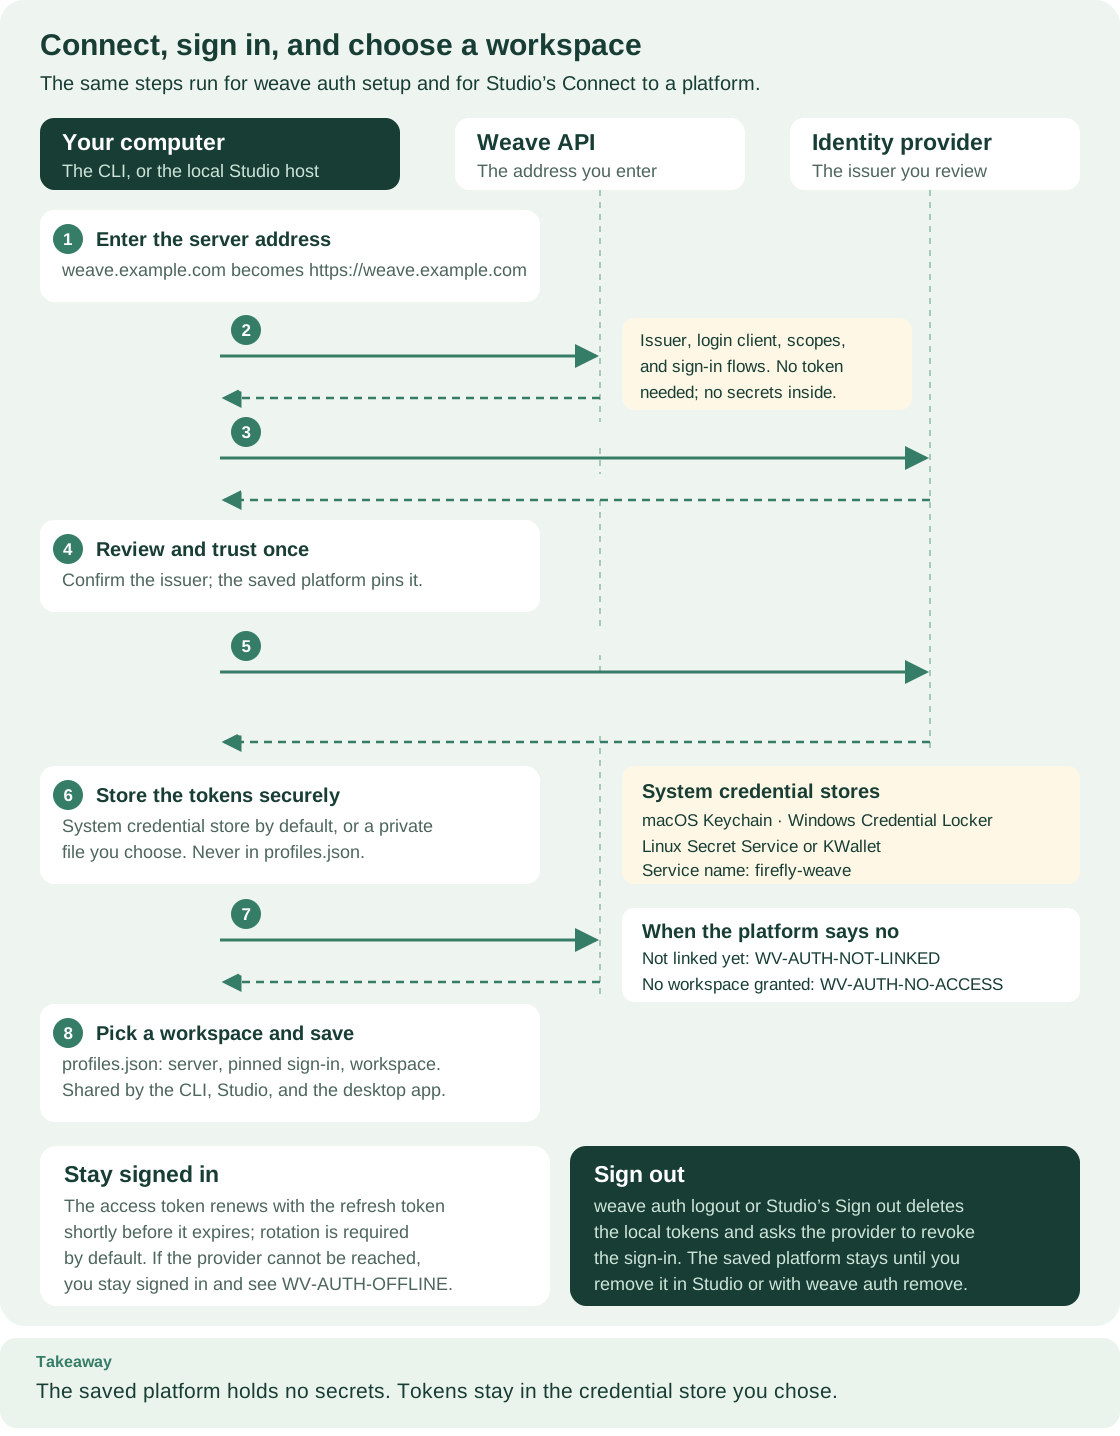
Read the numbered steps from top to bottom: Studio and weave auth setup follow
the same sequence. Tokens go to the credential store in step 6; only the address,
the reviewed sign-in settings, and the workspace reach profiles.json in step 8.
Open diagram at full size.
Use the connection assistant
Open the assistant in any of these ways:
- While you work locally, select Connect to a platform on Home, in the platform menu at the top right, in the designer next to "Saving, publishing and runs need a platform.", or on the Runs, My tasks, Email, Connections, and Workers pages.
- In Settings → Platforms, select Add platform while you use a platform, or Connect to a platform while you work locally.
To move to another saved platform, select Switch to this platform on its row in Settings → Platforms. Switch workspace, in the platform menu or on the platform in use, opens the assistant at its Workspace step.
A progress list shows four steps: Server, Review, Sign in, and Workspace. Press Enter to continue from any step, or select Back to return to the previous one.
1. Enter the server address
Type the address into Server address and select Continue. Studio adds
https:// when you leave out the scheme. Remote servers need HTTPS; plain
http:// works only for a server on this computer, such as a
local platform. While Studio checks the server, select
Cancel to stop.
Studio reads the server's public sign-in settings and checks each identity provider they name. No token is sent, and nothing is saved yet. If you already have saved platforms, they appear above the address field under Saved platforms; select one to use it again. Expected: the Review and trust step opens. If Studio shows a problem instead, find it in Fix a connection problem.
2. Review and trust the platform
Review and trust shows what the server proposed: the platform name, the server, the identity provider and its host ("You will sign in with …"), and the allowed sign-in methods. Continue only if you recognize them.
- When the server offers several identity providers, pick one under Identity provider. A provider with a problem is disabled and explains why.
- Name is how this platform appears in Studio and in the
weavecommand line on this computer. Use up to 64 letters, digits, spaces, periods, underscores, or hyphens, starting with a letter or digit. - Advanced shows the identity provider address, client ID, scopes, and any extra trusted origins.
- If you saved this server before, Studio says so and offers Use saved platform with its name.
Check I trust this server and identity provider, then select Continue. Studio saves the platform now and pins the settings you reviewed. If the server's settings changed between your review and the save, Studio stops with "The server's sign-in settings changed." and asks you to review them again. If you go back after saving, the name is read-only; select Remove and start over to change it. Expected: the sign-in step opens, titled "Sign in to" and the platform's name.
3. Sign in
Choose how to sign in to the platform. Your password stays with the identity provider; Studio never sees it.
- Sign in with your browser opens the identity provider's sign-in page. In a browser, select Open sign-in page; it opens in a new tab. In the desktop app, Studio opens your default web browser for you; select Open again if you closed it. Sign in, approve access, and come back to Studio: the page continues by itself.
- Use a code instead appears when your administrator allows sign-in with a code. Studio shows a short code and an address. Open the address on this or any other device, such as your phone, and enter the code. Copy code copies it.
- When your administrator allows only codes, the single button reads Sign in with a code.
Both methods show the Sign-in address with a copy button and how long you have left to finish. Cancel sign-in ends the attempt. A sign-in still waiting when you reload the page or leave the assistant continues in the background; the top bar shows it, and Studio tells you when it finishes. Expected: after you sign in, Studio moves on to Choose a workspace.
4. Choose a workspace
Choose a workspace lists the tenants, projects, and environments your account may use. With more than eight, Search workspaces appears above them. Pick an environment and select Start working. Studio returns to the designer if you came from there, otherwise to Home.
The workspace is saved with the platform, so the weave command line uses it
too. The top bar now shows the platform, the workspace, and Signed in.
Confirm them before you save, publish, or start a run.
If your account is not ready yet, this step says so instead of listing workspaces:
- "Your account doesn't have access to a workspace yet": you are signed in, but no workspace is shared with you.
- "You signed in, but this platform doesn't recognize your account yet": your administrator has not linked your sign-in to a Weave account.
Both show Details for your administrator, which name your identity provider, issuer, and account subject. Select Copy details and send them to your administrator, then Check again once they have acted. When an account is not recognized, Sign in with a different account lets you try another one. Administrators use these details in Find the provider ID, issuer, and subject.
What has been verified. Browser sign-in (PKCE) and code sign-in (device
flow) from the CLI were verified with the local Keycloak development platform.
The CLI's weave auth setup follows the same server, review, sign-in, and
workspace steps as Studio; see Connect the CLI to a platform. Studio's connection
steps are covered by automated browser tests against a simulated platform. An
opt-in browser test also ran them on macOS against a
local platform with its Keycloak 26.7.4 and the login
Keychain: pairing, connecting, browser sign-in, silent renewal, switching
account, an unreachable server, a cancelled sign-in, a REST call built in Studio
that ran to succeeded, and signing out; see
Validate a source contribution. Sign-in with
a code from a locally built macOS desktop app was also verified; see
What has been verified in the desktop guide.
Microsoft Entra ID and other identity
providers have not been verified; see the
provider notes. The
Windows and Linux credential stores are covered only by unit tests with simulated
backends.
Use a connection file (advanced)
Use a connection file when the server does not publish its sign-in settings, or when your administrator gives you one. A connection file is a JSON file of at most 64 KiB that holds sign-in settings only: the server, identity provider, issuer, and login client. The format is described under Connection files.
- On the Server step, expand Advanced and select Use a connection file. On the Review step, the same choice reads Use a connection file instead.
- Select Choose connection file, or drop the
.jsonfile onto the area. - Review the server, sign-in, client ID, scopes, and extra trusted origins that Studio shows, enter a Name, and check I trust this server and identity provider.
- Select Continue, then sign in and choose a workspace as above.
Studio refuses files that contain anything beyond sign-in settings, such as tokens, secrets, or credential file paths. The platform is saved like any other, marked as coming from a file.
Fix a connection problem
Each problem shows a plain explanation, and most also show a support code. Search these tables for the code or the words Studio shows.
| Support code | What Studio says | What to do |
|---|---|---|
WV-CONNECT-ADDRESS |
"That doesn't look like a server address." | Enter only the address, without paths such as /login |
WV-CONNECT-INSECURE |
"This address isn't secure." | Use HTTPS for a remote server; the problem offers a button to switch to the https:// address |
WV-CONNECT-BLOCKED |
"Studio can't connect to that address." | Reserved addresses such as 169.254.x.x or 0.0.0.0 never belong to a Weave server; check the address with your administrator |
WV-CONNECT-UNREACHABLE |
Studio couldn't reach the server | Check the address and your network; connect to your VPN if the server is on your company network |
WV-CONNECT-TLS |
Studio couldn't set up a secure connection | This computer does not trust the server's certificate; see the TLS note in If something goes wrong |
WV-CONNECT-TIMEOUT |
The server didn't answer in time | Check your network or VPN, then try again |
WV-CONNECT-REDIRECT |
"This address forwards to another location." | If the address Studio names is your Weave server, select the button that uses it |
WV-CONNECT-NOT-WEAVE |
"This doesn't look like a Firefly Weave server." | Use the address of the Weave server itself, not a sign-in page or a website |
WV-CONNECT-INCOMPATIBLE |
"This server runs a version of Firefly Weave that this Studio can't use." | Update Studio, or ask your administrator which version matches the server |
WV-CONNECT-NO-SIGN-IN |
"This server doesn't publish its sign-in settings." | Ask your administrator for a connection file, then select Use a connection file |
WV-CONNECT-PROVIDER |
"Studio couldn't check the identity provider for this server." | Try again; if it keeps failing, your administrator should check the platform's sign-in settings |
WV-PROFILE-CHANGED |
"The server's sign-in settings changed." | Review the new settings before you continue |
WV-PROFILE-STORE |
"Studio couldn't save platforms on this computer." | Make sure your user configuration folder is writable; see Where saved platforms live |
When a sign-in does not finish, the Sign in step explains why and offers Try again when another attempt can work:
| What Studio says | What it means |
|---|---|
| "Sign-in canceled" | You selected Cancel sign-in; nothing changed |
| "Sign-in timed out" | The sign-in request expired before you finished; start again and finish within a few minutes |
| "This sign-in is no longer active" | Studio restarted, or another sign-in replaced this one |
| "Sign-in was declined" | The request was declined in the browser or by the identity provider (WV-AUTH-DENIED) |
| "Studio couldn't save your sign-in" | The credential store is locked or unavailable (WV-AUTH-STORE); unlock your keychain or credential manager |
| "Studio couldn't reach the identity provider" | Check your network or VPN (WV-AUTH-OFFLINE) |
| "This identity provider doesn't offer sign-in with a code" | Sign in with your browser instead (WV-AUTH-DEVICE-UNAVAILABLE) |
| "Another sign-in finished first" | A different sign-in for this platform replaced this one (WV-AUTH-SUPERSEDED) |
| "The sign-in page sent back an unexpected answer" | Start again from Studio and finish on the page it opens (WV-AUTH-CALLBACK) |
| "The sign-in page isn't on an address you reviewed" | Studio stopped for your safety; your administrator should check the sign-in settings (WV-AUTH-TRUST) |
| "Your administrator doesn't allow this sign-in method" | Use the other method Studio offers (WV-AUTH-FLOW) |
| "This platform isn't ready for sign-in" | Review the platform in Settings, then try again (WV-STUDIO-CONNECTION) |
| "Sign-in didn't work" | The identity provider returned an error; try again, and if it keeps failing, ask your administrator to check the sign-in settings |
A successful sign-in can still be refused by Weave. The identity provider proves who you are; your administrator's link and grants on the platform decide what you may do. Follow People and access for that onboarding step.
Manage saved platforms
Saved platforms are shared with the weave command line on this computer.
A platform you save in Studio appears in weave auth profiles, and one you saved
with weave auth setup appears in Studio. Choosing a platform or workspace in
Studio changes the active one for the CLI too, and signing out in Studio signs
the CLI out of that platform.
Settings → Platforms lists every saved platform under the note "Studio keeps your sign-ins in this computer's credential store. This window never sees your password or tokens." Each row shows the Server, the Account ("Signed in as NAME" or "Not signed in"), and the Workspace ("Not chosen yet" until you pick one). In use marks the active platform, next to its status: Signed in, Session expired, Signed out, Signing in, or Not signed in. Studio checks only the platform in use; the others show the account last saved for them.
| Control | What it does |
|---|---|
| Switch to this platform | On a platform you aren't using: makes it active ("Now using NAME."); Studio asks you to sign in or choose a workspace when needed |
| Switch workspace | On the platform in use: opens the Workspace step |
| Sign in | On the platform in use while you are signed out: opens the sign-in step |
| Switch account | While signed in: shows the identity provider's sign-in page again so you can choose another account; with a code sign-in, Studio explains how to choose the account yourself |
| Sign out | While signed in: after you confirm, removes your sign-in from this computer and asks the identity provider to end it; the platform and workspace stay saved |
| The remove item in the row's ⋯ menu, such as "Remove staging" | After you confirm with Remove platform, forgets the platform and signs you out of it on this computer; your work on the platform is not affected |
| Add platform | At the top of the list while you use a platform: opens the connection assistant; while you work locally, the list offers Connect to a platform instead |
| Work locally | At the bottom of the list: stops using the active platform; saved platforms stay |
While you are signed out, the platform lists such as Runs say "You're signed out of NAME. Sign in to see runs and tasks." and offer Sign in, and Home asks you to sign in to see what needs you, your runs, and your tasks. The status stays Signed out; local authoring keeps working.
If the identity provider does not confirm a sign-out, Studio says "Signed out on this computer. Your identity provider did not confirm the sign-out." If Studio could not delete the sign-in from the credential store, a banner says it "couldn't remove its sign-in from this computer's credential store."
The platform menu at the top right shows where you work. Its button shows the platform name, the workspace, and your sign-in status, or Local authoring with "Create and edit on this computer". With a platform in use, it offers Switch workspace, then Switch account and Sign out (or Sign in while you are signed out), and Platform settings. While you work locally, it offers Connect to a platform and Platform settings. To change platforms or work locally, use Settings → Platforms.
Switching keeps your open workflow. When you change the platform or the workspace, or start working locally, the workflow stays open as a local copy and the platform's lists are cleared. If the workflow was saved or published on the platform and has changes you have not saved there, Studio asks first; select Stay here to save them. Afterward, save the copy as a new draft or save it to a file. While a command's outcome is still unknown, Studio refuses to switch and says "Finish or reconcile the pending command before changing the platform or workspace."
What Studio saves, and where
| What | Where | Shared with |
|---|---|---|
| Saved platforms: server, reviewed sign-in settings, allowed sign-in methods, workspace, last account name | profiles.json in your Weave settings folder |
The CLI and the desktop app |
| How Studio starts | studio.json in the same folder |
The desktop app |
| Access and refresh tokens | The operating system's credential store under the service name firefly-weave: Keychain on macOS, Windows Credential Manager, or Secret Service or KWallet on Linux |
The CLI, for the same platform |
| Workflows you edit while you work locally | This browser's local storage for Studio's address, shortly after each change, until you delete them from On this computer. The desktop app's host gets a new address at each launch, so use Save to file to keep a workflow after you quit | Not shared |
| A workflow you edit while you are connected | The Studio page's memory, until you save a draft or save it to a file | Not shared |
| The last run input for each workflow version, without fields its schema marks as secret | This browser's local storage | Not shared |
The settings folder is ~/Library/Application Support/Firefly Weave on macOS,
%APPDATA%\Firefly Weave on Windows, and firefly-weave under
$XDG_CONFIG_HOME or ~/.config on Linux; WEAVE_CONFIG_HOME overrides it.
Client configuration
describes both files, their permissions, and the
credential stores.
Nothing about platforms, accounts, or tokens is written to browser storage. Platforms you save in Studio use the system credential store. A platform the CLI saved with a private credential file keeps using that file. If the credential store is locked or missing, for example on Linux without an unlocked Secret Service or KWallet, Studio cannot sign in and says so; it never falls back to a plain file.
Starting Studio with a legacy profile file (weave studio --profile FILE)
turns saved platforms off for that session; Settings → Platforms then
explains that Studio was started with a connection file. Start weave studio
without --profile to save and switch platforms. The options are listed in
Studio commands.
Reconnect after a restart
Run weave studio again, or reopen the desktop app. weave studio names the
active platform on its first line, for example Firefly Weave Studio · Platform:
acme. Pair the browser with the new code; the desktop app pairs itself.
Studio opens at once, so local work never waits. In the background it checks the active platform: it renews your sign-in when the identity provider allows it, and confirms your workspace. When everything is fine, the top bar shows Signed in. A sign-in that was still waiting when the page reloaded resumes on the Sign in step.
When the check, or an action on a saved platform, finds a problem, a banner appears under the top bar. A banner also appears while a sign-in you left keeps waiting. It never blocks local work, and you can dismiss it.
| Banner (excerpt) | Button | What to do |
|---|---|---|
| "Sign in again to publish, run, and manage work. You can keep working locally." | Sign in again | Your session expired: the identity provider no longer renews it. Sign in; your platform and workspace stay saved |
| "doesn't recognize your account yet." | See details | Send the details to your administrator to link your account |
| "Studio couldn't reach" | Try again | Check your network or VPN |
| "Studio can't use this computer's credential store. Unlock or set up the system keychain, then try again." | Try again | Unlock your keychain or credential manager |
| "changed on the server. Review them before you use it again." | Review | Review the platform's new sign-in settings |
| "is no longer available to your account." | Choose workspace | Your access to the saved workspace was removed; choose another |
| "Choose a workspace on" | Choose workspace | No workspace is chosen yet |
| "Studio is waiting for you to finish signing in to" | Show sign-in | Return to the sign-in page, or open it again |
A saved platform keeps the sign-in settings you reviewed. If your administrator later changes the platform's identity provider or login client, connecting again under the same name fails because a saved platform already uses that name. Choose another name, or first remove the saved platform from its ⋯ menu in Settings → Platforms, then connect again.
Move between Studio, the CLI, and the SDK
All three clients use the same definitions and API operations, and the CLI and
Studio share saved platforms. Run weave auth setup once, and the next time you
start Studio it reconnects to that platform; see
Connect the CLI to a platform. Use Save to file
to get the YAML for review in Git, or Import workflow to open an existing
CLI-authored YAML/JSON file. A saved server draft is a shared resource; a locally
opened file is not uploaded until you explicitly save it. Layout sidecars affect
presentation only.
| Studio action | Equivalent workflow outside Studio |
|---|---|
| Connect to a platform | weave auth setup SERVER; see Connect the CLI to a platform |
| Import workflow or Save to file | Edit a YAML/JSON definition in your project |
| Validate | weave workflow validate or the Python compiler API |
| Save draft / Publish | Definition operations in the CLI tutorial or SDK tutorial |
| Activate / Start run | Activation and run API operations with the same workspace and grants |
| New API action | weave connector http-action or import-openapi; see Call a REST API without code |
| Claim / Complete task | Human task API, CLI, and SDK |
| Inspect / Archive run | Run discovery and lifecycle operations |
Draw and validate a workflow locally
Keep the step-by-step property reference open when choosing a step. It explains action calls, expressions, approvals, and the difference between step properties and workflow-wide settings.
Try it: draw your first workflow
This five-minute exercise works without a platform. You build a workflow that waits 30 seconds, watch Studio check it, and save it as a file.
- Start a blank workflow. On Home, select New workflow. Expected:
the Designer tab shows Start and End with an Add your first
step card between them. A new workflow is named
untitled-workflow, version1.0.0. - Name it. Select Start to open the workflow settings, change Name
to
first-wait. Valid edits are kept automatically. The name identifies the workflow on a platform and names the files you save. - Add a step. Select Add your first step. A picker titled "Add a step
here, at the start" opens. Type
waitin Search steps and actions and choose Wait for time. Expected: a step namedwait-1appears with the summary1 min, and the inspector opens. - Change the duration. In the inspector, set Duration to
30, choose seconds, and leave the field. Expected: the step summary reads30 s. - Read the check. A moment later, the Diagnostics bar at the bottom reads "Checked locally — Validate to check against the project". Studio's local host ran this check; nothing left your computer. A local check does not claim that the project's actions and connections are ready. Next to the version, the status reads Draft saved: Studio keeps your work in this browser as you edit.
- Look at the source. Open the Source tab: the same workflow is YAML,
with
kind: waitanddurationSeconds: 30. Canvas edits update the source at once; edits you type in Source take effect when you select Apply changes. - Save it to a file. Select Save to file. Expected: in a browser, two
downloads,
first-wait.yamlandfirst-wait.layout.json; the desktop app saves both files to your Downloads folder. The YAML file is the workflow; the layout file only keeps the positions on the canvas.
What you learned: a workflow is a sequence of steps between Start and End, valid inspector edits update that workflow automatically, and Studio checks your work as you go. Next, connect to a platform to publish and run it, or read on to learn every editor feature.
If a field contains an invalid edit, Studio keeps that draft visible and asks you to fix it before switching views, validating, saving to a file, or publishing. This prevents a downloaded or published workflow from silently using the previous value. Hiding the inspector keeps your draft; reopen it to finish editing.
Start a workflow
- On Home, select New workflow, select Use template on a row under Start from a template, or select Import workflow to open a YAML or JSON file of up to 1 MiB. You can also drop the file onto the top of Home.
- In Workflows, New workflow starts a blank draft, and its More ways to start menu offers Blank workflow, From a template…, and New API action. Import workflow opens an existing definition.
The templates are Call an API, Approval, then branch, Wait for a
signal with a time limit, Two calls at once, merged, and Customer
onboarding. A template opens as a new draft with its first step focused.
Approval, then branch uses the assignment binding name approvers;
before you can activate it, a task manager creates an enabled binding with that
name in your environment, as in human tasks, step 2.
Working locally, your workflows stay on this computer. Studio keeps each workflow in this browser shortly after every change, and the status next to the version reads Draft saved. Workflows lists them on the On this computer tab, next to Published and Drafts, which need a platform. On Home, Continue editing reopens the last one. Delete on a row removes a workflow from this computer after you confirm, and the message that follows offers Undo. A new workflow or template never replaces one kept here. While you are connected, a new workflow replaces the one in the window, so save a draft first. If the browser refuses storage, Studio says "Studio can't keep drafts in this browser. Use Save to file to keep your work."
Opening a workflow shows it at a readable zoom, between 75 and 100 percent, with Start at the top; scroll to see the rest.
Add and arrange steps
Select a + on the canvas to open the step picker at that exact position; in a
new workflow, select Add your first step. The picker's title says where the
step goes, such as "Add a step here, after check". Type to filter under Search
steps and actions; everyday words work too, so approval finds Human
task. Then choose a step: Call an action, AI task, Transform,
Decision, Decision table, Parallel, Wait for time,
Wait for signal, Human task, or Fail. When you are connected, the picker also lists Published actions;
choosing one inserts a step that already calls it. Focus moves to the new step;
Escape closes the picker and returns focus to the +.
The Steps palette on the left groups the same steps under Logic (Decision, Decision table, Parallel, Fail), Data (Transform), Waiting (Wait for time, Wait for signal), People (Human task), and Actions (Call an action, AI task). Hover a step to read what it does. Select a palette step to add it after the selected step, or drag it onto a + to place it there. Under Actions, Use an existing action lists your project's published actions. Working locally, Connect to a platform opens the connection assistant to browse that catalog. The separate Create an API action section opens New API action; you can configure and save an action file locally before connecting to publish it. Each section has an information control for more detail. In a window 1024 pixels wide or narrower, Insert step in the toolbar opens the palette.
- An empty branch shows a dashed card with the path's name and Add a step. In a Decision or Parallel, select the card to add the branch's first step.
- Each node summarizes its configuration. It shows, for example, the action it calls, a duration, or its conditions, such as "Amount > 1000 · otherwise". A step that still needs a choice has a dashed border and a chip such as Choose an action or Choose a condition; a step with errors has a red border and a chip such as "1 problem".
- A Decision's paths are labeled by their conditions. Each case's label on the canvas summarizes its condition, and the default path is Otherwise.
- Add a path for each answer, at the top of a selected Human task's inspector, adds a Decision after it with one case for each decision people can make.
- Drag a step onto a highlighted + to change execution order. The move offers Undo. Dropping on blank canvas leaves the step in its original place. The node's actions menu also offers Move to…, Duplicate and Delete step on hover, keyboard focus or right-click. A Decision or Parallel group keeps ownership of its nested steps; cycles and moving a group inside itself are rejected.
- A palette drop onto blank canvas creates an unplaced step. Studio lists unplaced steps in a bar under the canvas, each with a button, such as "Place Wait for time", that works like Move to…. Unplaced steps block saving to a file and publishing.
The canvas tools at the bottom right zoom out and in; the percentage between them returns to 100%. Fit all shows the whole workflow, and Tidy layout restores automatic positions and re-fits, reporting when the layout was already tidy. Below 60 percent, the overview keeps wrapped names, lane labels and problem dots. The + controls remain usable at 40 percent; press A or / with a step focused to open its following insertion slot. Very large graphs may fit below 40 percent; insertion buttons are hidden to avoid overlapping targets. Press A or / on a step to zoom to 40 percent and open its following insertion slot, or use the palette. A Human task without following answer paths offers Branch on the answer below its card. Scroll to pan, and hold Ctrl or Command while you scroll to zoom.
Start and End are fixed visual boundaries, including an empty Start → End flow; they are never added as synthetic execution steps.
Edit workflow settings and step properties
Workflow settings hold the name, version, input and output schemas, connection slots, workflow timeout, and workflow output. Open them by selecting empty canvas, the Start node, or the inspector's Workflow settings link, or by pressing Escape once to deselect the step. Inputs, Result, Connections, and Limits group the settings. Existing schema fields expand when selected. Valid edits are kept automatically.
Select a step to edit it in the inspector. Step name comes first. The step's settings follow in sections you can fold, such as Action, Connection, Input, and Output for Call an action, and Properties (Paths for a Decision, Branches for a Parallel); Studio remembers which sections you folded. Durations take an amount and a unit (seconds, minutes, hours, or days). Valid edits update the local definition after a short pause or when you leave a field. One Undo restores the edit. Invalid drafts stay inline while the canvas and source keep the last valid value; valid sibling fields still save. Leaving an invalid draft shows a Go back link to resume editing it. Advanced JSON, at the end of the inspector, provides a growing editor for the step. Show inspector and Hide inspector control the panel; in a window wider than 1280 pixels, drag its edge to resize it.
Choice fields open a list inside the window, even at the bottom of an inspector. Long lists have search. Use the arrow keys to move, Enter to choose, and Escape to close without changing the value. Page Up and Page Down move by a visible page of options.
Outcome messages offer Dismiss notification so you can clear feedback before continuing. Dismissing a message does not undo the change; use Undo when that is the action you want.
Renaming a step updates what reads it. Type the new name in Step name and
press Enter, or move to another field. Studio updates every expression that reads
the step's output, keeps YAML comments, and moves its layout. Fixed literal
values are never rewritten. New steps get readable names, such as
call-action-1, decision-1, or approval-1.
Duplicate and delete steps from the Step actions menu. The inspector's ⋯ menu (Step actions) offers Move to…, Duplicate, which copies the step right after itself, and Delete step. On the canvas, Delete or Backspace deletes the step that has keyboard focus. Studio refuses to delete a step that other steps or the workflow output still read, and names them. Deleting a Decision or Parallel group with steps inside asks you to confirm first. After a deletion, a message at the bottom of the window offers Undo; Undo in the toolbar also reverses a rename or a deletion.
Choose where each value comes from
Each field of an action's input offers three sources:
- Value: type the value.
- Data: use the workflow input or an earlier step's output. Suggestions follow what that field can actually read, including case and branch outputs.
- Formula: combine data with an operation.
Other expression fields in the inspector, such as a Transform's Value, also offer Fields, to build an object field by field, and List. Data you choose shows as a readable name, such as "Input › Amount".
The Fields builder opens with a row ready for its name. Select + Add field to add another, Use data to read workflow data, or Calculate… in the row's ⋯ menu to build a formula. Reorder or remove rows without opening JSON. Empty path and branch results start collapsed as Not set (optional).
Workflow settings and action steps share Connection slots. Rename a slot to update all its uses, see Used by N steps, or Remove it after reviewing the impact. Undo restores the slot and its assignments. When an action has no compatible slot, its Add a PostgreSQL connection slot button (named for the connector) creates and selects one for you.
Fields you do not touch keep their original expression. To write the whole input as one expression instead, select Write one expression for the whole input; Edit the input field by field switches back. Fields that a schema marks as secret are locked: Studio never enters, sends, or stores their values. In an action's input, the connection's credentials supply them. The expression rules are in Decide where a value comes from.
Design schemas
Input, output, signal payload, and human task form schemas open in a field designer. Select Add field for each field and choose its type, whether it is required, a label, help text, and allowed values. Paste sample JSON finds fields in an example; the local Studio host does the work and keeps only field names and types, never the sample's values. Reject fields that are not listed forbids extra fields, and Show schema JSON previews the result. Each schema also has a link to edit it as JSON instead.
Check your workflow as you edit
Studio checks the workflow by itself shortly after every change, including while you type in Source. The Diagnostics bar at the bottom shows one status line: "Not validated yet." before the first check, "Checking…" while a check runs, "No problems found." when there is nothing to fix, or the counts, such as "2 errors, 1 warning. Fix the errors to publish." Working locally, it adds "Actions and connections are checked when you connect." When nothing is wrong but steps still need an action, it says so, for example "No errors · 4 steps still need an action."
Select Validate to run the full check. When you are connected with permission to compile, Validate also checks actions and connections against the project catalog, and "No problems found." then means they all resolve. Passing the local check alone does not prove that actions or worker releases are available.
Each diagnostic row shows what is wrong, a hint, and where, such as "Step decision-1 · Case 1 condition". Select the location to open the step, or the workflow settings, with the field focused. Details shows the support code and the compiler's own wording. Apply suggested edit applies a proposed fix as one undoable change. Select Diagnostics to fold or unfold the rows. Steps on the canvas show the same problems as a red border and a chip such as "2 problems".
Simulate a run
Simulate runs the compiled workflow step by step without calling real systems. It needs a connected platform and permission to simulate. In Simulate this workflow, enter the Workflow input and, under Action results, the result each action should return, or select Skip this action to stop the simulation there. Select Start simulation.
The Simulation panel takes the inspector's place beside the canvas. It shows the status, the simulated time, and the current steps after Now at. On the canvas, the current step is highlighted, the path taken is drawn in color, finished steps show a check, and steps the run has not reached are dimmed. Select a step to see its simulated input and output in the panel. While a simulation runs, editing is paused: the canvas says "Simulating. Editing is paused." and offers Stop simulation.
When the run waits, the panel offers the matching control as its main button: Submit decision for a human task, the send button under Send a signal, or a duration under Advance time. Continue and Step move on, and under Breakpoints you choose steps where Continue pauses. Step results shows each step's output and, at the end, the Workflow output; Activity lists what happened. Start over returns to the setup.
Edit source, undo, and save to a file
Source shows the same workflow as YAML or JSON; choose the format in Source format. Type your changes and select Apply changes to update the graph. If the text is not a valid definition, Studio keeps exactly what you typed, shows the problem, and makes the graph read-only until you repair it ("Read-only until the source is fixed"). YAML comments survive the edits you make on the canvas. Switching to JSON asks first, because JSON cannot keep comments (Convert and remove comments). Outline lists the steps as an indented tree with branch labels.
Undo and redo cover your editing only. They undo changes to the workflow and its layout, never a published version, a started run, a human decision, or a sent email. Every insertion and move also has a keyboard-operated button or target picker. Press ? on the canvas, or select Keyboard shortcuts in the canvas tools, to see the shortcuts:
| Keys | What they do |
|---|---|
| Ctrl+Z or Command-Z, with Shift to redo | Undo and redo |
| Ctrl+S or Command-S | Save a draft on a connected platform, or save to a file while you work locally |
| Ctrl+Enter or Command-Enter, in the inspector | Flush valid edits immediately |
| Arrow up and down, while the canvas or outline has focus | Select the previous or next step |
| Enter, on a focused step | Edit the step in the inspector |
| Delete or Backspace, while the canvas has focus | Delete the focused step |
| + and −, while the canvas has focus | Zoom in or out |
| Ctrl+0 or Command-0 | Zoom to 100% |
| Shift+1 | Fit all steps on screen |
| Escape | Cancel a gesture or close a picker; on a selected step, show the workflow settings |
Save to file saves the definition and a separate .layout.json file. The
layout file holds positions, the viewport, and the definition's digest; it is
never part of what runs. The browser downloads both files; the desktop app saves
them to your Downloads folder. Working locally, Save to file is the
designer's main button; while you are connected, it is in the toolbar's More
menu (⋯).
Studio is designed for a desktop-size screen. In the designer, the navigation shows icons only to give the canvas room; the menu button at the bottom of the sidebar (Expand navigation) shows the names again. In a window 1280 pixels wide or narrower, the navigation shows icons only everywhere. At 1024 pixels or narrower, Insert step opens the step palette. At 767 pixels or narrower, the inspector opens over the canvas, and the toolbar moves its other commands into More. Below 600 pixels, a workflow opens on its Outline, and Show canvas switches to the designer.
While you are connected, the workflow you are editing lives in the page's memory, so save a draft before you reload the page; the browser asks first. Working locally, Studio keeps your workflows in this browser's storage. Studio never writes tokens, or task or email content, to browser storage.
Call a REST API from a step
Studio can turn one HTTPS request, or operations from an OpenAPI document, into
Actions on the built-in weave-http@2.0.0 connector, with no code. You build and
publish the Action, an administrator allows it with a connection, and you
activate and run a workflow that uses both.
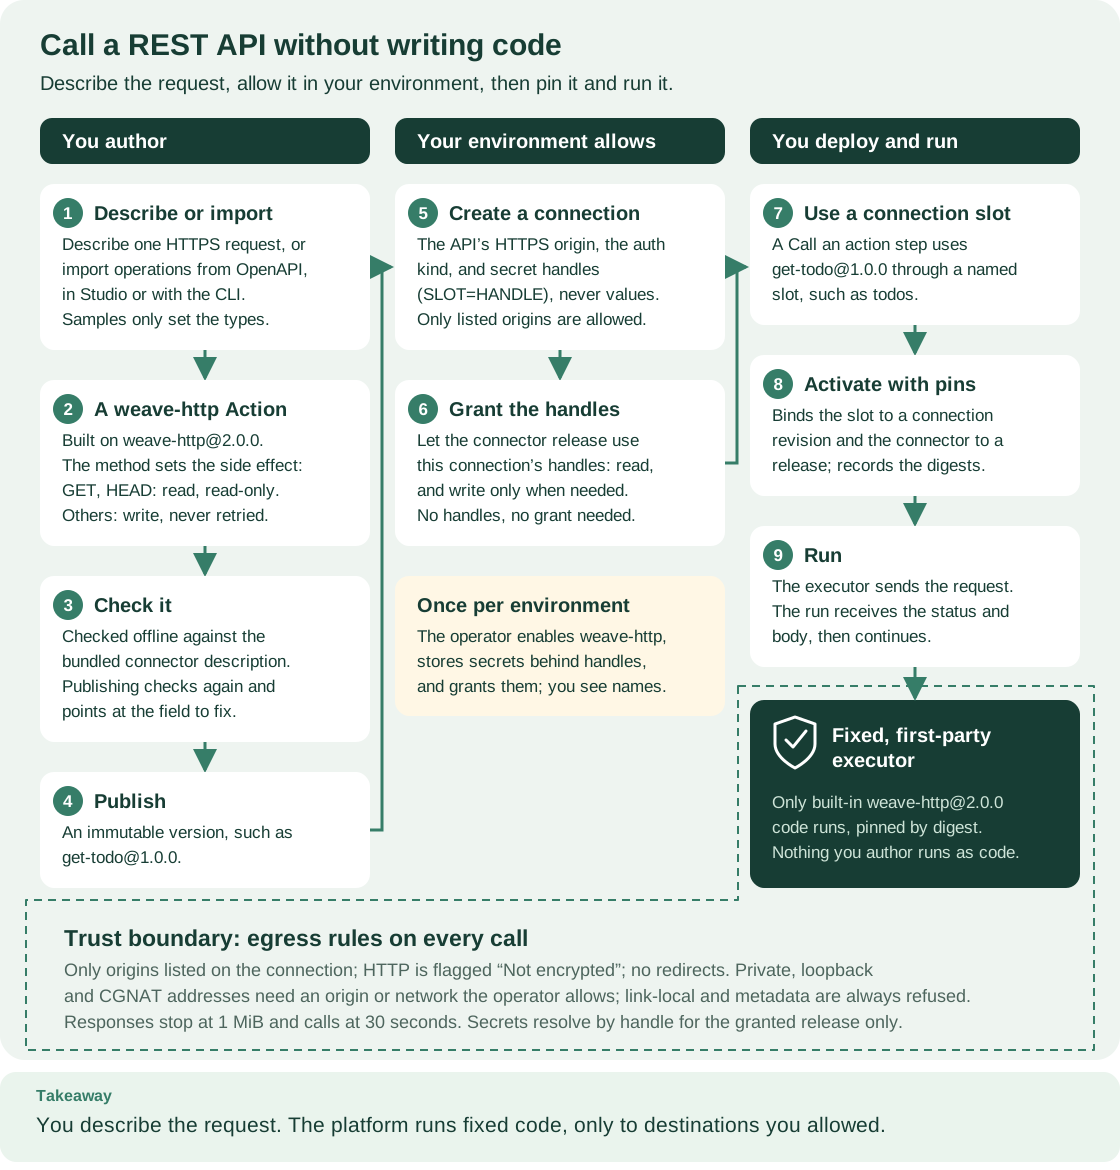
Read the three columns from left to right: what you author, what your environment allows, and what you deploy and run. The shaded card in the middle is the operator's one-time preparation. Everything inside the dashed boundary is enforced by the platform's fixed executor, whatever you authored. Open diagram at full size.
Before the first call, a platform operator prepares the environment once: the built-in connector, an executor release, and stored secrets. Those steps, the roles each person needs, and the equivalent CLI commands are in Call a REST API without code.
Open the API action builder
Any of these opens New API action:
- In the inspector of a Call an action step that has no action yet, select New API action under Action.
- In the palette, under Create an API action, or in the step's action picker, select New API action.
- In Workflows, open More ways to start and select New API action.
While you work locally, these entries are always there. While you are connected, they appear only when your account may publish definitions in the workspace; otherwise the palette says to ask a developer to publish an action.
While you are connected, the builder starts with one readiness line: "Ready to publish", or how much is missing, such as "2 things to set up". Select Show to list each step. Each says what is missing and Who acts: you, a workspace administrator, or the platform operator, sometimes with a command to Copy. Select Check again after someone has acted. Studio cannot see platform settings such as executors and secret grants, so even when it is ready, the details read "Looks ready. Studio can't see platform settings, so the first run confirms it."
Describe a request
On the Describe a request tab, fill in:
- Action: a Name, a Version, and an optional description.
- Request: the Method, the API address (the HTTPS or HTTP origin), the Path, and its Parameters (path, query, or header; text, whole number, or yes or no).
- How the API checks who is calling: No sign-in, API key in a header (with the Header that carries the key), User name and password, Bearer token, or OAuth client credentials. The connection holds the secret; Studio never asks for secret values.
- Send a JSON body, for methods that change data, described by An example or A JSON Schema.
- Response: the Success statuses and how to describe the body (An example, A JSON Schema, or Leave it untyped), plus the Timeout in seconds (1 to 30).
The local Studio host builds the Action from your description as you type. Nothing is sent to the API you describe.
Import operations from OpenAPI
On the Import OpenAPI tab, select Choose a file for a JSON or YAML document on this computer, or paste it under Or paste it here. Studio never downloads documents from the internet. Then:
- Select List operations. Studio shows how many operations can be imported and why the others cannot.
- If an operation needs it, turn on an import option for documents Weave cannot read as they are. Each option becomes a warning on the actions it changes; the options are explained in Import operations from an OpenAPI document.
- Check the operations you want, or Select all ready, and optionally enter a Name for this API (optional) for the connection.
- Select the create button, such as Create 1 action. Review each created action, or use Download all actions and Download the import policy.
Check and publish the action
Action preview names the Action and says whether it reads or changes data. Show YAML shows the read-only YAML, with Copy YAML and Download .action.yaml. The builder's footer stays in view with Cancel and the next step. When you are connected:
- Check with the platform runs the platform's full check; "The platform accepts this action." means it passed.
- Publish action publishes the version for your project after you confirm. If that version is already taken, Studio suggests the next free one.
- If the project cannot use the built-in HTTP connector yet, Studio says what is missing. When the connector is installed but not published in this project, someone who can publish selects Publish the built-in HTTP connector, once per project. When it is not installed, ask the platform operator.
Without a connection, download the file and ask a developer to publish it, or publish it yourself after you connect.
Insert the action into your workflow
After publishing, select Use in this step when you opened the builder from a step, or Insert into workflow otherwise. Studio sets the step's action and binds it to a connection slot named after the API, declaring that slot when the workflow does not have it yet. A step that already uses a compatible slot keeps it. The whole insert is one undo step.
When you cannot publish, because you work locally, the platform refuses the publication, or the platform has no built-in HTTP connector, Insert as placeholder and Use as a placeholder in this step add a step that refers to the action anyway. Download the file, and have it published before you run the workflow.
Create the API connection
Every environment binds the slot to a connection when a version is activated. While you are connected, select Create a connection for this API in the step's inspector, or New connection in Connections. The New API connection dialog takes the names and the API address from the builder when you come from it:
- Under API, Connection name, the name you choose when you activate a
workflow, and API address, the HTTPS or HTTP origin only. An
http://address shows a Not encrypted notice: the connection works, but requests travel in plain text. - Under Authentication, How the API checks who is calling: the same choices as the builder. OAuth client credentials add Client ID, Token endpoint, Scopes (optional), and How the client secret is sent.
- A handle field for each secret. Enter the name under which the secret is
stored, never the secret itself. On a local platform, you store values with
weave platform secret set; on a shared platform, the operator tells you the handle names. - Allowed destinations: the only addresses the connection may call. The API address and an OAuth token endpoint are always included; select Add destination for others.
Select Create connection. Studio confirms the new revision, for example "Created pets (revision 1).", and offers Check configuration (no request is sent). Under Last step: let the connector use this connection, it shows the grant command with the real revision ID: on a platform on this computer, a command to run, with Copy command; on a shared platform, a command and its request file for an administrator, with Copy for an administrator. Select Done, or Back to the workflow when you opened the dialog from a step.
Without permission to create connections, you prepare a request instead. The button reads Prepare the request for an administrator. Studio then shows Ask an administrator with the Connection request (connection.json), which names stored secrets by handle only. Send it with Copy request, Download connection.json, or Copy command. In Connections, an existing connection shows its API address, Authentication, Secret names, and Destinations, never secret values; Technical details holds the adapter and the revision ID.
Activate and run the workflow
Publish the workflow, then select Activate…. The activation dialog, titled with the workflow's name and version, such as "Activate first-wait 1.0.0", lists connections under Connections, with a Connection to choose where a choice is needed. When only one compatible choice exists, Studio groups it under items picked automatically; select Review to inspect it. Integration versions, task versions, and people and teams use the same review. Select Activate version; a failure is shown inside the dialog so you can correct the bindings. Then select Start run…, as described in the next section.
Save, publish, activate and run
The editor header separates where you are from what you can do. Its first row shows the workflow name, version, save state, and Designer / Source / Outline views. The second row groups editing controls, validation and simulation, then the main save or run action. Secondary commands are in More; narrow screens move additional commands there to keep the primary controls reachable. Zoom, Fit all, and Tidy layout remain with the canvas because they affect only its presentation. The connection information button opens help when you need it instead of taking space away from the controls.
Why four separate steps? A draft is work in progress that colleagues can open. Publishing freezes a version that can never change. Activating decides where that version runs and with which connections and people. Starting a run executes it once with real input. Each step needs its own permission.
The designer's toolbar shows one main button at a time, for the next step: Save draft, then Publish…, then Activate…, then Start run…. The other commands are in the toolbar's More menu (⋯). The status next to the version says where you are, such as Draft saved. Draft → Published → Active marks the current stage. A command that can't run stays in place; select it and Studio says why under the toolbar, for example "Publish this version before activating it." Screen readers announce the same reason. Each result appears for a few seconds at the bottom of the window, often with a button for the next step.
- Save a draft. Select Save draft, or press Ctrl+S (Command-S on macOS). Expected: "Draft saved." and the status Draft saved once the platform has stored it. If a colleague saved the same draft first, Studio says "Someone else saved this draft. Your version is still here. Compare them before you save." Draft changed on the server shows both versions side by side and keeps your work: select Keep editing locally, or Save as a new draft instead of overwriting theirs.
- Publish a version. Select Publish…. Studio checks the workflow first, against the project catalog when your account may compile, then asks you to confirm with Publish version. The platform compiles the version again before it records it; any problems appear in Diagnostics. If that version number is already taken, Studio offers to publish as the next patch version instead, with a button such as "Publish as 1.0.1". Expected: "Published first-wait 1.0.0." with Activate, and the status "Published 1.0.0".
- Activate it. Select Activate…, or Activate in that message. The activation dialog, such as "Activate first-wait 1.0.0", binds the published version to your selected environment: choose a Connection where needed, and review the Integration versions, Task versions, and People and teams it needs. Single compatible choices are picked automatically; select Review to inspect them. Version labels use the release's declared capability versions; Technical details keeps full release IDs and image digests available for support. Under People and teams, Studio lists only enabled bindings with the step's exact assignment name; if none exists, it says "No enabled assignment binding named NAME exists here. A task manager creates one." Select Activate version. The platform rejects missing or invalid bindings, and the dialog stays open, showing the problem, until the activation succeeds. Expected: "Activated first-wait 1.0.0 in Payments / Production." with Start run, where the last part names your workspace.
- Start a run. Select Start run…, or Start run in that message. In Start a run, the version you activated is preselected under Version to run. Optionally open Add a business key (optional) to enter a Business key and a Correlation key. Fill in Run input: a form built from the workflow's input schema, or JSON with Edit as JSON. Select Start run. Expected: "Started run" and the run's short ID, with View, which opens the run in Runs.
Every start creates a new run, even with the same business key; a business key groups related runs. Studio remembers the last input for each version in this browser, leaving out fields the schema marks as secret.
Follow and manage runs in Runs.
- Find runs with the filters above the list: type an exact business key in Search by business key, choose All, Waiting, Failed, or Succeeded, or open More filters for an exact Correlation key and Include archived runs. The list updates as you change a filter. In a narrow window, the filters fold behind a button such as "Filters (2)".
- Open a run to watch it. The Now line says what it is doing, such as "Waiting for a person at review, assigned to reviewers", and offers Open task or Open My tasks when a person must act (what each reason means). The graph of the version it runs marks the current step Now and finished steps with a check. Timeline lists the recorded events in plain sentences, each with View raw event, and Technical details holds the run ID, the correlation key, the artifact, and the run data. The view does not update by itself: select Refresh at the bottom of the run's detail.
- Pause run and Resume run need their own permissions, ask for a Reason, and appear only while the run hasn't finished; only one of them shows at a time. Studio has no controls to cancel or retry a run or to resolve an incident; a blocked run shows "This run stopped at" and the step. Use the CLI or the API, as in incident operations.
- Archive run, under Archive, hides a finished run from the list and keeps its history. Open More filters and check Include archived runs to show it again; Restore run returns it to the list.
- Delete run data permanently deletes an archived run's data. It needs a separate permission, a Reason, and the exact run ID, and the platform refuses it while references or active work remain. Deletion is never automatic.
Manage runs and business cases explains business keys, archiving, and deletion in depth. To try a workflow without running it for real, use Simulate.
If the network fails after you submit a change, the result is unknown. Studio says, for example, "Studio didn't get an answer for "Start run".", keeps the exact request, and offers Check now, which resends the same request with the same idempotency key so the platform reports what happened instead of doing it twice. Expected: "Checked. Start run finished." Studio never retries an approval, a run start, or an email by itself. While you are connected, your source stays in memory when a check or a save fails; save it to a file before you close the page.
Complete human work
My tasks is your inbox for approvals and other human tasks that you are allowed to see. Who may see and decide a task is set by your administrator; see People and access. Your identity provider proves who you are, and Weave's grants decide which tasks you may handle. On Home, Needs you lists tasks ready to claim next to runs that failed or wait.
- Find a task. Open My tasks. Search, or use the status filter: All tasks, Ready to claim, Claimed, Completed, Expired, or Canceled. A task you claimed shows "Claimed by you".
- Open it. The detail lists the task's business context as labels and values (nested values under Technical details), when it is Due, when it Expires, and, once decided, who it was Decided by. A due time only marks the task as needing attention; it never decides anything.
- Claim it. Select Claim task. Expected: "Task claimed. Fill in the form, then choose a decision." Claiming makes you the only person who can decide it; Release task gives it back to the other candidates ("Task released. Others can claim it now.").
- Decide. Under Your decision, fill in the form, then select a decision button. The buttons carry the decision names, such as Approve or Reject, and stay disabled until the form is valid ("Correct the fields marked with an error."). Studio asks once, for example "Approve Review expense 104? You can't change this later."; select the decision again to confirm, or Back.
Expected: "Approved Review expense 104." Studio opens the next task that is ready to claim, if there is one. The decided task shows its Recorded outcome, and the run continues. Studio always records you, the signed-in person, as the decision actor; you cannot act on someone else's behalf.
If the task changed, Studio keeps your answers. When someone else acted first, or you lost access, Studio says "This task changed or you lost access to it. Your answers are still here. Refresh before you try again." Select Refresh in the task's detail. Completed, canceled, and expired tasks are read-only. The same rules apply to the CLI, the SDK, and your products; see human tasks.
Read and reply to email
Email lists the conversations you are allowed to read and shows each message as plain text with a status, such as "Received" or "Sent to mail server"; Studio never runs received HTML. To answer, open a conversation, write in Reply, and select Send reply: Studio queues the reply and hands it to the mail server in one step. Expected: "Reply sent to the mail server." If it is only queued ("Reply waiting to send."), the reply shows "Waiting to send", and Send now sends it.
"Sent to mail server" means the mail server took the message, not that the recipient received or read it; Studio says "Mail servers don't confirm delivery or reading." When the result is unknown, Studio says "We couldn't confirm it was sent. Check the status before sending again." Select Check status, which never sends twice, and agree with your operator before sending again; Studio never resends by itself. A reply never completes a human task.
Your reply text stays only in this browser tab; it is not saved as a draft on the platform and does not survive a page reload.
When a step does not work
| What you see | What to check next |
|---|---|
| The pairing code is refused, or "Your Studio session ended" | Restart weave studio and pair with its new code; codes work once, within five minutes |
| The top bar shows Local authoring after a restart | No platform is active; select Switch to this platform in Settings → Platforms, or connect |
Saved platforms could not be read when Studio starts |
profiles.json is damaged, locked, or not yours; see Where saved platforms live |
| A connection or sign-in problem with a support code | Find the code in Fix a connection problem |
| The credential store banner | Unlock your keychain or credential manager; on Linux, start an unlocked Secret Service or KWallet |
| "Sign-in for … is managed by the weave command line" | Studio was started with a profile file whose sign-in the CLI manages; run weave auth login in a terminal, then Check again |
| No workspace appears, or your account is not recognized | Send Details for your administrator; a sign-in alone does not grant access |
| A designer command doesn't run | Select it: Studio says why under the toolbar; you may need a platform, a workspace, or another permission |
| HTTP 403 for one operation | Confirm that your current role permits that operation in the selected workspace |
| An action reference is not found | Choose a published action version from this project's catalog |
| "This platform doesn't have the built-in HTTP connector installed." | Ask the platform operator to prepare the environment |
| A valid workflow cannot activate | Check its connection slots, worker release bindings, and human assignment bindings |
| A saved draft changed on the server | Use the revision-conflict comparison; keep your work or save it to a file before reloading |
| "Studio didn't get an answer for …" | Select Check now in that banner before you do anything else; it resends the same request, so nothing happens twice |
For server startup, see local platform troubleshooting. For deployment and worker failures, see operational troubleshooting.
Next steps
- Choose and configure each step: every field of every step kind, with examples.
- Call a REST API without code: the operator's one-time setup and the CLI equivalents of the API action builder.
- Add human approvals and manage runs and business cases.
- Install the desktop app to use Studio without a terminal.
Validate a source contribution
This section is for contributors who change Studio's own code.
# Run these commands from studio/. Check types strictly, then formatting.
npm run check
npm run format:check
# Run the adapter and transport unit tests.
npm test
# Check the Angular templates and build the production bundle.
npm run build

# Install the owned browser-test runtime, then exercise pointer and keyboard UI.
npx playwright install chromium
npm run test:browser
Expected: each command exits with status 0, and Playwright reports no failed tests.
The browser suite includes a real loopback host test of pairing, the content
security policy, start preferences, and local validation when the repository
Python .venv is available. Connected API fixtures test request shapes and
failure handling; they are separate from database/mail transport integration
evidence. tests/browser/real-platform.spec.ts drives the connection, sign-in,
session expiry and revocation, switch-account, and quick-integration journeys
against a running local platform and its Keycloak, with the system credential
store; it is skipped unless WEAVE_E2E_PLATFORM_DIR and
WEAVE_E2E_PERSON_FILE are set, as its header explains. Its quick-integration
test also needs WEAVE_E2E_ACME_ORIGIN, the Acme fixture origin the platform
approved with weave platform up --allow-private-origin; the run stage of
scripts/acceptance.py sets it. Tests use owned fixtures and never a production
service.