Write and simulate your first workflow
In this tutorial, you write a workflow that receives a message and returns the same message. You check it with the compiler and run it in the local simulator. It is for anyone new to Weave, including process designers who will later draw workflows in Studio. You need only the installed CLI and a terminal: no server, Docker, database, or account.
Result: a successful simulation whose output is {"message": "Hello,
Weave"}. A simulation runs only on your computer and saves nothing; the
CLI tutorial later publishes the same workflow and runs
it durably on a platform.
Prefer a generated starting point? weave init my-first-workflow creates a
working example with its own README. This tutorial takes the hands-on route: you
write each file yourself, learn what every line means, and reuse the files in
later tutorials.
Coming from a BPM tool? A workflow is your process model, a step is an activity, and a run is a process instance. Coming from BPM/BPMN has the full translation.
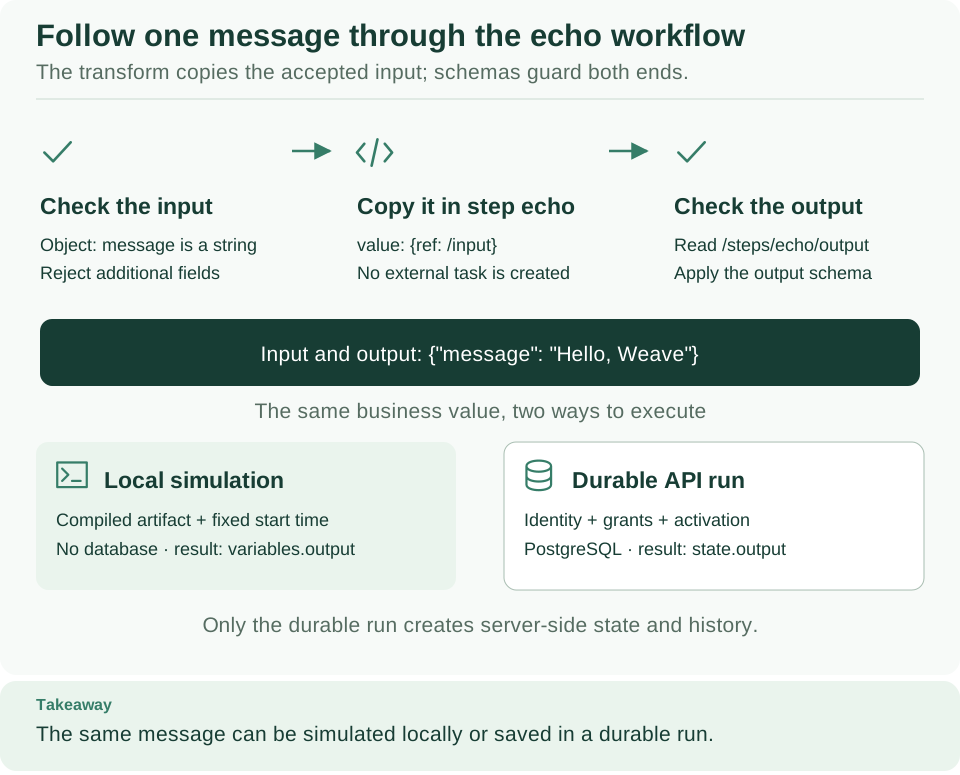
Follow the upper row to see what the workflow you are about to write does: check the input, copy it, and check the output. The lower row compares the local simulation in this tutorial with a durable run on a platform.
Before you start
Open a Bash or Zsh terminal in a directory where you keep your work. The commands
below create files under .local/tutorial/ in that directory; stay in the same
directory for the whole chapter. On Windows, use WSL. You also need python3 for
a short script that assembles a JSON request.
Expected: Firefly Weave followed by a version, and Python 3.12 or later. If
weave is not found, follow the installation guide's PATH
instructions first.
Working in a source checkout instead? From its root, run uv sync --locked
--python 3.12, then define this function once in the same terminal:
Then use the same weave commands below. Installed-CLI users skip this.
See the steps before running them
| Step | What you create | How you recognize success |
|---|---|---|
| 1. Write | A YAML workflow | The file describes one input, one step, and one output |
| 2. Validate | A check result | validationOk: true, ok: true, and no errors |
| 3. Compile | Three local artifact files | ok: true and partial: false |
| 4. Simulate | One in-memory execution | status: "succeeded" with Hello, Weave in its output |
workflow is a command family; validate, compile, and simulate are
commands within it. You can ask for help at either level:
# Describe the workflow command family, then one command and its options.
weave help workflow
weave workflow compile --help
Expected: the list of workflow commands, then the options of compile. None
of these steps publishes a workflow or starts a server.
Create the definition
A workflow definition describes the input, the steps, and the output. Save this one by copying the entire block into your terminal:
# Keep the tutorial files together so later commands can reuse them.
mkdir -p .local/tutorial
cat > .local/tutorial/echo.workflow.yaml <<'YAML'
apiVersion: weave/v1alpha1
kind: Workflow
metadata:
  name: echo
  version: 1.0.0
spec:
  inputSchema:
    type: object
    properties:
      message: {type: string}
    required: [message]
    additionalProperties: false
  outputSchema:
    type: object
    properties:
      message: {type: string}
    required: [message]
    additionalProperties: false
  steps:
    - id: echo
      kind: transform
      value: {ref: /input}
  output: {ref: /steps/echo/output}
YAML
Expected: no output; the file .local/tutorial/echo.workflow.yaml now exists.
Running the block again replaces this file, so save personal edits elsewhere
first. In the Weave repository, .local/ is ignored by Git.
Read the definition from top to bottom:
| Field | What it means in this example |
|---|---|
apiVersion |
The version of the workflow language, not of the installed CLI |
kind |
This document is a workflow |
metadata.name and version |
The workflow's name and the version it will have when published |
inputSchema |
The input must be an object with one string field, message, and nothing else |
outputSchema |
The final output must have the same shape |
steps |
One step, with the ID echo |
kind: transform |
A Transform step: it computes a value inside Weave, with no external call |
value: {ref: /input} |
The value is the entire workflow input |
output: {ref: /steps/echo/output} |
The workflow returns what the echo step produced |
ref is a reference to workflow data, not Python code or a file path. /input
is the whole input object; /input/message would be just its text. That text is
a string, so it would not match the object that outputSchema requires.
Validate the file
The compiler needs a catalog: the list of actions, connectors, schemas, and worker contracts that a workflow may use. Echo uses none of them, so an empty catalog is complete:
# This workflow calls no external actions, so an empty catalog is complete.
cat > .local/tutorial/empty-catalog.json <<'JSON'
{"definitions": [], "tasks": [], "adapters": [], "schemas": {}}
JSON
# Check the definition against that catalog and treat warnings as errors.
weave workflow validate .local/tutorial/echo.workflow.yaml \
  --catalog .local/tutorial/empty-catalog.json --strict --output json
Expected: a JSON result with "validationOk": true, "ok": true, "partial":
false, and an empty diagnostics list. The definition and all of its
dependencies passed. If a diagnostic names a file, line, or path, fix that part
of the YAML and validate again.
Without --catalog, the check is partial. You may see examples that leave it
out while a definition is being edited. They report validationOk: true with
partial: true and ok: false, which is expected in that mode. Studio shows
the same kind of partial check while you work locally.
Compile it into an artifact
Compiling checks the complete definition and its dependencies, then produces an artifact: the checked form that the simulator and the platform run.
# Turn the checked definition into an artifact for simulation and inspection.
weave workflow compile .local/tutorial/echo.workflow.yaml \
  --catalog .local/tutorial/empty-catalog.json --strict \
  --directory .local/tutorial/compiled --output json
Expected: ok: true, partial: false, and three new files:
| File | Purpose |
|---|---|
.local/tutorial/compiled/compiled-artifact.json |
The compiled workflow with its identity and source information |
.local/tutorial/compiled/executable.json |
The executable part of the artifact |
.local/tutorial/compiled/catalog.lock.json |
The exact dependencies used for this compilation |
The artifact's digest identifies its executable content, so never edit the
generated files to change behavior: edit the YAML and compile again. The
compiler refuses to overwrite existing files. When you repeat this tutorial on
purpose, add --force to replace these three generated files.
Simulate one execution
The simulator needs the compiled artifact, an input, and a start time. Echo calls no integrations, so there are no external responses to mock. This block builds the request and runs it:
# Bundle the compiled workflow, a sample input, and a fixed start time into one request.
python3 - <<'PYCODE'
import json
from pathlib import Path

root = Path('.local/tutorial')
request = {
    'artifact': json.loads((root / 'compiled/compiled-artifact.json').read_text()),
    'input': {'message': 'Hello, Weave'},
    'mocks': {},
    'now': '2026-01-01T00:00:00Z',
}
(root / 'simulation.json').write_text(json.dumps(request, indent=2) + '\n')
PYCODE
# Run the workflow once in memory; nothing is saved or sent anywhere.
weave workflow simulate .local/tutorial/simulation.json --output json
Expected: "status": "succeeded". The JSON also lists the events the run went
through and its variables; variables.output is {"message": "Hello, Weave"}.
The fixed start time makes every simulation of this request identical. It does
not change your computer's clock or schedule anything.
Try it with another input. Change Hello, Weave in the block above and run
it again. The output changes while the definition stays the same: you ran the
same workflow with different input, exactly as a platform runs one workflow for
many cases.
Optional: open the workflow in Studio
Studio, the visual editor, can open the same file. Start it as described in the
Studio guide, choose Work locally if Studio asks how you
want to work, then on Home select Import workflow and pick
.local/tutorial/echo.workflow.yaml. .local is a hidden folder: in the file
dialog, press Cmd+Shift+. on macOS or Ctrl+H on most Linux desktops to show it,
or drag the file onto the top of Home ("You can also drop it here."). Expected:
the designer opens with a graph of Start, the echo Transform, and End,
checked as you edit. Simulating in Studio needs a connected platform.
Check what you learned
You now have a definition, a compiled artifact, and a successful simulated run. They are different things: the YAML describes the behavior, the artifact records the checked behavior, and a run applies it to one input.
| What you see | Why | What to do |
|---|---|---|
weave: command not found |
The command directory is not on your PATH |
Follow the installation PATH steps; source users need the function above |
WV-CLI-READ |
The file path is wrong for your current directory | Check the file name, and run the commands from the directory that holds .local/ |
partial: true during validation |
--catalog was left out |
Add --catalog .local/tutorial/empty-catalog.json |
WV-CLI-EXPORT on your second compilation |
The output files already exist | Use a new --directory, or add --force for these generated files |
WV-COMP-TYPE_MISMATCH or another schema diagnostic |
A value does not have the shape a schema requires | Compare the object or string shape with the diagnostic's file, line, and path |
Keep this working directory: the CLI tutorial reuses echo.workflow.yaml and
empty-catalog.json.
Next steps
- Learn the ideas behind what you just did: read concepts.
- Practice reading diagnostics: in the authoring lab, introduce a mistake, read its diagnostic, and repair it.
- Draw workflows visually: continue with Studio.
- Run it durably on your own platform: start a local platform, then publish and run with the CLI.
- Your team already runs Weave: connect the CLI to that platform, then publish and run with the CLI tutorial.