Choose and configure a workflow step
This page tells you which step to choose for each part of a process and what every field in Studio's inspector means. Keep it open next to the Studio guide while you draw. It is for process designers and developers; you need Studio running, locally or connected to a platform. Coming from a BPM suite? Coming from BPM/BPMN maps BPMN elements to these steps.
A step is one node of a workflow. Its kind decides which properties it has; adding a field that belongs to another kind does not add that behavior. Studio writes the same versioned definition language that you can edit as YAML or build with the CLI and the Python SDK, so every choice here is visible in the Source tab.
This page describes the Studio 0.1.0a14 editor. The step kinds and native human tasks are also part of alpha6, but several controls described here, such as the canvas step picker, the searchable action picker, the Value / typed input rows with Use data and Calculate…, the schema designer, the API action builder, and the simulation setup and panel, are new in 0.1.0a7. An alpha6 or earlier browser bundle does not have them; to see the same screens, install the alpha14 browser application.
How to use this page:
| You want to | Read |
|---|---|
| Pick the right step for a part of your process | Start with the outcome you need |
| Add, rename, move, or delete a step | Add a step and Edit a step in the inspector |
| Fill in one kind of step | Configure each step |
| Describe a form, a signal payload, or the workflow input | Design forms and payloads |
| Call another system | Configure Call an action |
| Pass data from one step to the next | Decide where a value comes from |
| Check, simulate, and run the result | Validate, simulate, and check before running |
Start with the outcome you need
| I need to… | Choose in the palette | Kind in Source | What happens during a run |
|---|---|---|---|
| Call a service, system, or connector | Call an action | action |
Weave schedules a published Action and its admitted implementation |
| Apply reusable business rules | Decision table | decisionTable |
Weave evaluates a versioned table with a declared matching policy and result schema |
| Ask a model for a typed result | AI task | llm |
A durable worker uses an explicit workflow profile and authorized connection |
| Build or select data | Transform | transform |
Weave evaluates an expression without an external call |
| Take one route based on data | Decision | switch |
Weave evaluates cases in order and follows the first true case, or the Otherwise path |
| Run independent branches | Parallel | parallel |
Weave runs named branches within the configured concurrency |
| Delay for a fixed period | Wait for time | wait |
Weave records a durable timer; a worker does not sleep for the duration |
| Wait for an external event | Wait for signal | signal |
Weave waits, up to a timeout, for an authorized, schema-valid signal with the configured name |
| Ask a person to decide | Human task | humanTask |
Weave creates an assigned task with a form and allowed decisions |
| Stop with a business error | Fail | fail |
Weave records the supplied error code and message |
Start and End mark the boundaries of the process. They are fixed visual nodes, not extra executable steps. Start is also a button: select it to open the workflow settings. A blank Start → End process can return its input or a literal output; it does not need an artificial Transform just to be a workflow.
Add a step
- From the palette. The Steps pane groups the kinds under Logic
(Decision, Decision table, Parallel, Fail), Data (Transform), Waiting
(Wait for time, Wait for signal), People (Human task), and Actions
(Call an action, AI task);
hover a kind to read its one-line description. Select a kind to insert it
after the selected step, or at the end of the main sequence when nothing is
selected. You can also drag it onto a + on the canvas. Search steps
filters the list, and everyday words work:
approvalfinds Human task. In a window 1024 pixels wide or narrower, open the palette with Insert step. - From the canvas. Each + opens a picker titled with the position, such as "Add a step here, after call-api"; in an empty workflow, select Add your first step. Type in Search steps and actions. The list has a Steps group and a Published actions group. Choosing a published action inserts a Call an action step that already uses it. Escape closes the picker.
- Into an empty branch. A decision case or parallel branch with no steps
shows a dashed card with the branch's label, such as "Condition not set",
Otherwise, or
first, and Add a step. Screen readers announce it as "Add a step here, in Case 1 of decision-1". The card keeps the empty route visible; the branch still returns its own output.
After an insert, Studio selects the new step, opens it in the inspector, and
moves keyboard focus to the new node. New steps get readable IDs by kind:
call-action-1, transform-1, decision-1, parallel-1, wait-1,
signal-1, approval-1 for a human task, and fail-1.
Each node shows its ID and a one-line summary, for example
get-record@1.0.0 · api, 1 min, Amount > 1000 · otherwise, or
2 branches · max 2. A step that still needs a choice has a dashed border and a
chip that says what to choose: Choose an action for an action step that has
none, or Choose a condition for a decision with a case whose condition is
not set. A step with problems from the last check has a red border and a chip
such as "1 problem".
Edit a step in the inspector
Select a step to edit it. The inspector heading shows the kind's palette label.
- Step name. This is the step's ID: later steps read this step's output by it. Type a new name and press Enter, or move to another field. Studio checks that the name is unique and updates every expression that reads the step; values inside a literal are data and stay unchanged. The hint under the field says where the step sits, such as "Main sequence" or "Case 1 of decision-1".
- Sections. The step's fields follow in sections you can fold. A Call an action step starts with choosing the action, its connection, and its input; technical contract metadata is under Action details, and changing the workflow's slots is under Manage workflow connection slots. Other steps use purpose-specific headings such as Transform data, Wait time, AI task setup, Paths, and Branches. Studio remembers which sections you folded for each kind. Optional human-task deadlines stay folded until you need them; folding a section preserves its controls and drafts. Advanced JSON, at the end, shows the same step as JSON, and Properties table switches back. Fields Studio does not edit are listed under Additional properties preserved; change those in the Source tab.
- Automatic edits. Valid fields update the local definition after a short pause or on leaving the field, with one Undo for the edit. Invalid drafts stay inline and preserve the last valid graph; valid sibling edits still save. Fix an invalid field before switching steps or views, validating, saving to a file, or publishing. Studio keeps the field visible and explains what needs attention; it does not export an older value behind your back. Hiding the inspector keeps its draft. The Source editor retains its separate Apply changes action.
- Workflow settings. The link in the inspector header opens the workflow's own properties. Selecting empty canvas, selecting Start, or pressing Escape does the same.
- Move, duplicate, and delete. The footer's ⋯ menu (Step actions) offers Move to…, which waits for you to select a + on the canvas, Duplicate, and Delete step. A decision or parallel group with steps inside reads "Delete group with 2 steps" (with its own count) and asks first. Studio refuses to delete a step that later steps or the workflow output still read, and names them. After a deletion, the message that appears offers Undo.
Durations take an amount and a unit. Duration, Timeout,
Due after, Expires after, and Workflow timeout each pair a number
with a unit select: seconds, minutes, hours, or days. Studio
stores whole seconds, so 1.5 minutes is saved as 90. The field shows the
largest unit that divides the stored value evenly: 7200 appears as 2 hours.
A value that is not a positive whole number of seconds shows "Enter a positive
duration in whole seconds." Leave an optional duration empty to remove it.
Configure each step
| Palette label | Inspector fields | Why it matters |
|---|---|---|
| Call an action | Published action (connected) or Action version, Connection slot, Input | Chooses the reusable operation and its per-call business data |
| Decision table | Published table, Table version, Table input, Create a reusable decision table | Reuses a published rule set and maps the data it evaluates |
| AI task | AI action version, Workflow AI profile, AI connection slot, AI prompt, AI context | Uses a bounded model configuration with explicit credentials and typed output |
| Transform | Value | Its result becomes the step output available to later steps |
| Decision | "Case 1 condition" and "Case 1 output", one pair per case, then Otherwise output | Every route has an explicit output, including an empty branch |
| Parallel | Run at most … branches at once, then one output per branch, such as "first output" | Controls independent work and the shape of the combined result |
| Wait for time | Duration | Sets a durable relative delay |
| Wait for signal | Signal name, Timeout, Payload schema | Defines which event can resume the wait and what data is accepted |
| Human task | Assignment binding, Title, Context, Decisions, Due after, Expires after, Form schema | Defines who may claim the work and what a valid decision contains |
| Fail | Error code, Message | Gives operators and calling products a business failure they can recognize |
Every step also has a unique ID. References to earlier step results use that ID; moving steps can change what they may read. The compiler checks those relationships, and What each step can read lists the rules.
Decision table
Choose Decision table from the Logic palette. Select a Published table
when connected, or enter its immutable name@version in Table version.
Map Table input from workflow data, a fixed value, or a formula. The table's
declared output becomes available to later steps in the Data picker.
Create a reusable decision table opens the table editor. Set the table name and version, define its input and result fields, and choose the matching policy: first matching rule, exactly one matching rule, or collect all matching rules. Rule cards provide typed conditions, results, reorder buttons and Remove. Use Try an input to check sample data without running a workflow. You can export the table as YAML, or publish and use it with the required project permissions. The decision table reference defines exact matching, no-match behavior, limits and API/SDK usage.
AI task
Choose AI task from the Actions palette. The built-in action reference is
weave-agentic-generate@1.0.0; Studio indicates whether that action is available
in the connected catalog. Select a Workflow AI profile and an AI connection
slot, then map AI prompt and AI context using Value, Data or Formula.
Open Configure workflow AI profiles to create or edit a named profile in a dialog with room for the form. It uses the same Model → Connection → Review structure as Lumi, but saves only to this workflow. To use another connection slot without changing the model, select that slot directly in the inspector.
- Model: choose the provider, model, and maximum response length, then describe the expected result with the schema designer. For Azure, Model is the deployment name. Expand Advanced model settings only when you need generation controls, a reasoning strategy, or different execution limits. Studio checks combinations of settings against the platform's model contract before enabling Continue to connection. This check runs locally; it does not contact the model or verify credentials.
- Connection: choose the AI connection slot, or select Add AI connection slot to include a new slot when you apply. An authorized administrator can also open New AI connection to create an environment connection using an operator-provisioned secret handle. Activation binds the slot to that environment connection; this wizard does not activate the workflow.
- Review: check the profile, provider, model, slot, and list of affected AI steps. Apply workflow AI settings applies the profile, slot, and current step's references together. Back keeps the draft; Cancel profile changes discards unapplied profile edits. Apply or cancel these edits before switching to another step. Existing named profiles affect every step listed in the review.
Use Shared AI context to select results from earlier AI steps available on
this path. Existing context stays under data; selected results appear under
sharedAiResults. This is structured data within one execution, not memory
shared between unrelated runs. The compiler enforces which prior results can be
read. See Share context between AI steps for a complete
example and the limits across branches, waits, and retries.
Provider credentials belong to an authorized connection, not the prompt or profile. Workflow AI profiles are separate from Studio's Lumi assistant settings. The AI worker guide covers deployment, supported providers, credential binding and execution limits. A configured inspector alone does not install the action or start a worker.
Transform
Value is an expression. Its result is the step's output. For a literal, a mapped object, or a reference, Studio works out the output's fields, so later steps get suggestions for them. The node summary says what the value does: "Fixed value", "Copies /input/customer", "Builds 2 fields", or "Computes a value".
Decision
A new decision has one case with no condition yet: the node shows Choose a condition, and the field says "Choose when this path applies." until you set one. Weave tests the cases in order and takes the first one that is true; otherwise it takes the Otherwise path.
Build each case's condition, such as "Case 1 condition", from rule rows. In each row, choose the data to test
(placeholder "Choose data"), a test (is, is not, is greater than,
is at least, is less than, is at most, is present, or is
missing), and, for most tests, a value. Select Add condition for another
row; with two or more rows, choose All of or Any of. The rows write the
same expression as before; for example, "amount is greater than 1000" becomes
{op: {name: gt, args: [{ref: /input/amount}, {literal: 1000}]}}. Edit as
formula opens the condition in the general expression editor, and Use
condition rows switches back when the rows can show it; a condition the rows
can't show opens there directly. On the canvas, each path is labeled with a
summary of its condition, such as "Amount > 1000".
Each path has one card containing its rules, reorder and remove actions, and a collapsed Path result. Empty results read Not set (optional); their stored literal empty objects remain unchanged until edited. + Add path adds a card before Otherwise, which always stays last. The first matching path runs. Human-task answer checks use titles such as Approve and Reject. Nested steps stay on the canvas. Move them out before removing a path; a Decision keeps at least one non-default path.
Parallel
A new group has two branches, first and second, and reads Run at most 2
branches at once. This positive whole number limits how many branches may run
at the same time. Each branch declares an output, labeled with its name ("first output").
The group's output is an object with one field per branch name. Under Parallel
branches, rename a branch in its text box, delete an empty one with Remove,
or add one with Add branch. A group keeps at least one branch.
Wait for time
Duration is required; a new step waits 1 minute. The run continues when the
durable timer is due. The duration control explains the pause in your selected
unit. The step's output is null, so later steps have nothing
to read from it.
Wait for signal
- Signal name is the name a sender must use. It accepts letters, numbers,
dots, underscores, and hyphens. A new step starts empty;
message-receivedis a hint to replace with your own name. The compiler requires each signal name to be unique in the workflow. - Timeout is required; a new step waits up to 1 hour. If no matching signal arrives first, the run ends as timed out.
- Payload schema describes the accepted data. Edit it with the schema designer; its preview reads "Preview of the signal fields".
The step's output is the received payload, so later steps read
/steps/<step ID>/output/<field>.
Human task
The inspector groups Who, What they see, How they answer, and Deadlines. Assignment suggestions use the connected environment; offline, enter the binding name directly. The title can be typed or bound with Use data. Context uses named Fields, and the reviewer form has a live inert preview.
| Field | What to enter |
|---|---|
| Assignment binding | A name, reviewers by default. Each environment maps it to an assignment binding with exactly this name when you activate the version (Human task assignments). A task manager must first create an enabled binding with that name in the environment, with weave human-groups put and weave human-assignments put; see human tasks, step 2. Studio cannot create bindings |
| Title | An expression that produces 1–512 characters, such as a literal "Review request" |
| Context | An expression that produces an object; reviewers see it as business context |
| Answers | 1–32 unique identifiers, approve and reject by default. Add or edit an answer chip; renaming updates matching decision-path comparisons in one undoable edit |
| Due after | Optional. Marks the task overdue; it does not decide anything |
| Expires after | Optional. When it passes, the whole run times out |
| Form schema | The fields a reviewer fills in, edited with the schema designer; the preview reads "What reviewers will see" |
The task's output has two fields: decision (one of Answers) and data
(the submitted form). Create a path for each answer adds a decision right after
the task with one case per answer, each testing
/steps/<task ID>/output/decision. Reviewers complete the task in
My tasks; human tasks covers
claims, eligibility, and audit history.
Fail
Error code accepts letters, numbers, dots, underscores, and hyphens. Message starts empty and must contain your failure reason. A Fail step ends its path, so no later step on that path runs and nothing after it can read data from that path.
Design forms and payloads with the schema designer
The schema designer edits Input schema and Output schema in the workflow settings, a signal's Payload schema, and a human task's Form schema.
- Select Add field. Enter a Field name, choose a Type (Text, Number, Whole number, Yes/No, Choice, Group, List, File, Any value, or Empty), and check Required if the value must be present.
- Select Details for Label shown to people, Help text, a Text format (such as Date and time or Email address), Allowed values, length or value limits, and Can be empty (null). A list asks what Each item is; a group of fields gets a button that adds a field inside it.
- Check Only allow these fields to refuse extra fields.
- Read the preview under the fields; it renders the form people will see.
Paste sample JSON opens Find fields from an example. Paste a JSON example, add up to nine more with Add another example, and select Find fields. Studio's local host reads only the field names and types; the values are not saved. If the schema already has fields, choose Keep them and add new fields only or Replace them with the example's fields.
Show schema JSON displays the result. The link below each designer, such as "Edit form schema as JSON", switches that schema to a raw JSON editor, and Use the field editor switches back. A schema that cannot be shown as a list of fields is kept unchanged; edit it in the Source tab.
Understand action calls before configuring one
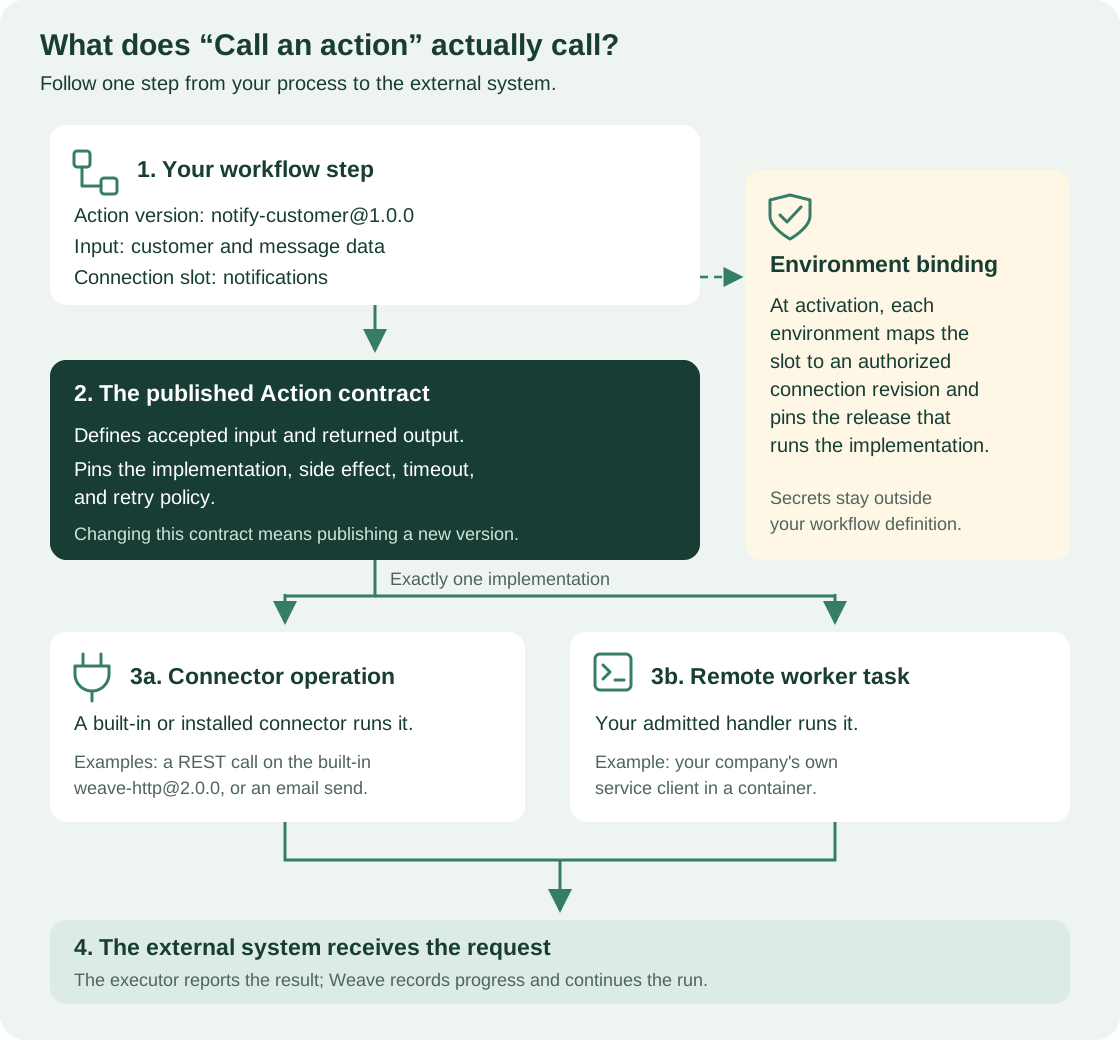
Read the diagram from top to bottom: the step names an Action version, the Action pins the implementation, and activation binds the slot to a real connection in each environment. Secrets never pass through the workflow definition. Open diagram at full size
There are three definitions involved:
- The Workflow step says which Action version to call, what input to send, and which logical connection slot to use.
- The Action describes the reusable operation: input/output schemas, implementation, timeout, retry policy, and side-effect behavior.
- A Connector declares operations that its installed adapter can execute. An Action can instead use a remote worker task.
For example, a step can call your published notify-customer@1.0.0 Action. That
Action may use an email connector's send operation. Another version could use a
worker implementation, but a workflow pinned to version 1.0.0 does not silently
switch implementations when someone publishes version 2.0.0.
A valid graph alone does not install connector code, start a worker, create a connection, or grant access. Use connector authoring and worker deployment to prepare those dependencies, or call a REST API without code through the built-in HTTP connector.
Configure Call an action
The inspector's Action section walks through the step in order: choose the action, read what it needs, pick a connection slot, map the input, and use the output.
1. Choose the action
When you are connected and your account can read the catalog, Published action is a searchable list (placeholder "Search by name, API or operation"). It matches every word you type against the name, version, connector or worker, operation, and description, and lists name matches first. Results are grouped under HTTP APIs for the built-in HTTP connector, one group per other connector, Worker actions, and Other actions. Use the arrow keys and Enter to choose, Escape to close the list, and Tab to leave without choosing. Load more actions fetches the next page of the catalog, and New API action opens the builder when you can publish.
Choosing an action loads its contract. If exactly one workflow slot fits the action's connection, Studio selects it. Studio never declares a new slot from this list; use Add connection slot for that.
The palette's Use an existing action list, under Actions, shows up to six published actions that match the palette search. Selecting one inserts the step and its slot as one undoable change: Studio reuses the workflow's only compatible slot or, when none fits, declares one named after the connector. When several slots fit, choose one in the inspector. Screen readers announce what happened, for example "Inserted call-action-1, which calls get-pet@1.0.0, and added the connection slot petstore."
Working locally, Connect to a platform opens the connection assistant so you can browse the project's catalog. The separate Create an API action section opens New API action. You can configure and save an action file locally; publishing it for the project requires a platform connection and permission. The information controls explain each choice and support Enter and Escape.
The action picker and inspector show a different state when the catalog is unavailable:
| What you see | What it means | What to do |
|---|---|---|
| Working locally. and Open Settings | Studio is not connected to a platform | Type the exact name@version in Action version at the top of the Action section, or connect in Settings to choose from the catalog |
| "Studio could not confirm your account's permissions, so published actions are hidden." | The platform has not confirmed what your account may do | Check the platform connection in Settings |
| "Your account cannot read the action catalog in this workspace." with "Needed permission: catalog.read" | Your grants lack catalog.read |
Ask an administrator for a role that includes it, such as Workflow editor, or type the action version |
| "Loading published actions…" | The catalog is loading | Wait for the list |
| "Published actions could not be loaded." with a support code | The catalog request failed | Select Try again; quote the support code if it keeps failing |
| "This project has no published actions yet." | The project's catalog is empty | Select Refresh actions after someone publishes one, or create one from an API |
Give people the right access explains roles and grants.
2. Read what the action needs
What this action needs summarizes the published contract:
| Row | Shows |
|---|---|
| Runs on | Connector with its reference, such as weave-http@2.0.0, or Worker with its task type and version |
| Operation | The connector operation the action calls (connector actions only) |
| Connection | "No connection needed", "Requires a crm@1.0.0 connection", or "Optional crm@1.0.0 connection", with the action's own connector |
| Side effect | "Read only — safe to retry", "Idempotent — safe to retry", "Retried with an idempotency key", "Not idempotent — never retried automatically", or "Not declared" |
| Timeout | The action's timeout in seconds |
| Retry | "One attempt, no automatic retry", or "Up to 3 attempts, waiting 1–30 seconds between them" with the action's own numbers |
Timeout and retry belong to the published action version. To change them,
publish a new Action version and deliberately select it in the workflow. Do not
add retry or timeoutSeconds to an action step: those fields are not part
of the step's contract. Output schema, under the output section, shows what
the action returns.
While the contract loads, the section reads "Loading the action's details…". If it fails, it shows "The action's details could not be loaded." with Try again.
3. Choose a connection slot
Under Connection, Connection slot lists the workflow's slots that fit the
action: the same connector, and never an optional slot for a required
connection. Until Studio knows the action's contract, it lists every slot the
workflow declares. Each option reads slot · connector, for example api ·
weave-http@2.0.0. The empty option reads "Choose a connection slot" when the
action requires a connection, and "No connection" otherwise. A slot that no
longer fits is marked "(not compatible)".
If no slot fits, select Add a PostgreSQL connection slot (the connector's name changes with the action). Studio creates and selects the slot in one step.
The Connection slots list is shared with workflow settings. Each row shows Slot name, Connector, Required, and Used by N steps:
- Change Slot name and leave the field to rename it. Studio updates all steps that use it, including steps in decision paths and parallel branches.
- Choose a connector reference, or enter
name@versionwhen working offline. Invalid names and versions stay in the field with an explanation. - Turn Required on if every environment must supply a connection at activation.
- Remove explains which steps will lose their slot before changing anything. Undo restores the slot and its step assignments together.
In workflow settings, Add connection slot also lets you declare a slot before adding an action. Enter New slot name and New slot connector, then select Add slot.
A slot is a name, not a credential. Activation maps each slot to an authorized connection revision for the chosen environment, so passwords and tokens never enter the workflow. When you are connected and the step uses a slot on the built-in HTTP connector, Create a connection for this API opens New API connection; the no-code integration guide explains what a connection holds and who must grant it.
4. Map the input
When the action's input schema lists fields, Input shows one row per field. Each row starts with the editor for its schema type: text, numbers, yes/no, choices, dates, lists, groups, or files. Use data opens the typed picker; a selected reference appears by name and Remove data restores the prior fixed value while editing that field. Choose Calculate… from the field's options menu to combine values with a formula. Formula operands have their own value or data control without another mode switch above the formula.
Fields bound to Data or Formula count as filled in. Fields you do not touch keep their original expression. A secret field is locked and reads "Supplied by the connection's credentials; workflows can't set it."
Write one expression for the whole input replaces the rows with one Input expression under Properties, starting from the values you typed. Edit the input field by field switches back; if the expression cannot be shown as fields, Studio asks first (Replace with fields or Keep the expression). While a value is invalid, Studio keeps it in view and asks you to fix it before switching. Without a contract, for example while working locally, map the input with the Input expression.
Field-by-field input is stored as an ordinary expression:
# The step that a field-by-field input produces, as shown in the Source tab.
- id: get-record
  kind: action
  uses: get-record@1.0.0
  connection: api
  with:
    object:
      id: {ref: /input/recordId}
      includeHistory: {literal: false}
When every field holds a typed Value, Studio stores the whole input as one
literal object instead.
5. Use the output
Later steps read the action's result at /steps/<step ID>/output. Copy output
reference copies that path. Use action output as workflow result asks you
to confirm replacing the workflow result and its schema, then offers Undo.
After confirmation, it sets the
workflow output to that reference and copies the action's output schema into the
workflow's Output schema. It is available for steps in the main sequence;
for a nested action, expose the value through the enclosing branch output first.
6. Resolve an incomplete configuration
Until the step is complete, the section lists Configuration incomplete with the reasons:
| Reason | What to do |
|---|---|
| "Choose a published action." or "Enter the action version to call." | Choose or type the exact name@version |
| "crm-lookup@1.0.0 is not in the published catalog for this project. Choose a published action." | The version is unpublished or belongs to another project; choose one from the list |
| "Fill in the required inputs: customerId." | Give each named field a value, data, or a formula |
| "Choose a connection slot for crm@1.0.0." | Choose a compatible slot, or add one |
| "The workflow has no connection slot named crm. Choose another slot or add it." | The step names a slot the workflow does not declare |
| "Slot crm does not provide a required crm@1.0.0 connection." | Choose a slot whose connector matches and that is required |
| "This action does not use a connection. Clear the slot." | Choose "No connection" |
| "Fix the step configuration JSON." | Advanced JSON holds text that is not a valid step |
These are quick inspector checks. Validate runs the compiler, which is the authority on whether the step is valid.
Create an action from an API
While the step has no action, or still uses the placeholder your-action@1.0.0,
the Action section says "No action yet? Describe the API request, or import
an OpenAPI document, and Studio builds the action with no code." and offers New
API action. That button, and New API action in the picker and the palette,
open the New API action builder with two tabs: Describe a request and Import OpenAPI. After you
publish the action, the builder offers Use in this step when you opened it
from a step, or Insert into workflow when you opened it from the palette.
When the builder cannot publish, for example while working locally, it offers Use as a placeholder in this step or Insert as placeholder instead. Save the action with Download .action.yaml and publish that file before you run the workflow. Connected without permission to publish, these entries are hidden and the palette reads "To call another API, ask a developer to publish an action." Call a REST API from a step walks through the builder in Studio, and Call a REST API without code explains the built-in HTTP connector, what a described request may contain, OpenAPI import rules, and the operator's one-time setup.
Decide where a value comes from
Expression fields such as Value, Title, Context, Input, and outputs have a keyboard-operable mode switch beside their label. Typed action inputs start with their value control, Use data, and Calculate… in the field menu. Conditions keep rule rows, with Edit as formula for complex logic:
| Mode | Writes | Use it for |
|---|---|---|
| Value | literal |
Type something that stays the same on every run, such as the message "Ready for review" or the number 3. |
| Data | ref |
Read a value that can change on each run, such as the customer ID in the workflow input or a previous step's result. |
| Formula | op |
Apply a supported rule to values: compare an amount, check whether a list contains an item, or choose the first available value. This is not a JavaScript or Python editor. |
| Fields | object |
Build one record with named properties, such as customerId and channel. Each property can use a fixed value, data, or a formula. |
| List | array |
Build an ordered collection, such as two recipients. Each item can use its own value or data source. |
Start by asking “Does this value change between runs?” If not, choose Value. If it comes from the request or an earlier step, choose Data. Choose Fields when the receiving system expects a record with several named properties, and List when it expects several items. Use Formula only when you need a supported operation to produce the value.
The ⓘ Data source chip opens a When should I use each source? guide with explanations and examples. Click it or focus it and press Enter; Escape closes it and returns focus. Help stays collapsed until you need it. The editor uses the expected field type to offer relevant sources:
- An AI prompt or human-task title needs text. It offers Value, Data, and Formula. Its formula list offers first available of, which selects a value or fallback; comparisons produce Yes/No and do not belong in a prompt.
- Human-task context needs an object. Use Fields to assemble it, Data to reuse an object, or Formula to select a fallback object.
- Workflow output follows the workflow's output schema. A list output offers List; a record output offers Fields.
- A Transform or untyped AI context can hold any JSON value, so all sources remain available. For action input, the published action's schema determines each field's controls.
An imported expression is never removed just because it does not match the expected type. Studio retains it and shows a repair hint. Choosing a source does not prove the complete workflow is valid: use Validate after mapping data, and check the connection and worker requirements before running it.
For example, to send a customer record to an integration:
- Select the integration step and open its Input section.
- If the published action provides input fields, use those rows. Otherwise,
choose Fields for the whole input and add a field named
customerId. - Choose Use data for
customerId, then select the customer ID under Workflow input. This reads the current request's ID on every run. - Add
channeland typeemailas a Value. It remains the same on every run. - Validate the workflow. If a required input is missing, fill it before publishing. The YAML example below shows the resulting mapping.
Fields is the object builder for Transform values, human-task context, and results. Each row has a name and a value. Use data reads another field; Calculate… in the row's ⋯ menu builds a formula. + Add field focuses the new name. Move rows with the arrow buttons or choose Remove. Existing literal objects retain their original YAML shape until you edit them. Raw JSON is available only through Advanced: JSON value in the row menu.
These are the same rules in the property editor and YAML:
# Build a business object from a reference and a fixed value.
value:
  object:
    customerId: {ref: /input/customerId}
    channel: {literal: email}
# A decision condition: check whether the request is marked urgent.
when:
  op:
    name: eq
    args:
      - {ref: /input/urgent}
      - {literal: true}
Supported operations are eq, ne, lt, lte, gt, gte, and, or, not,
exists, coalesce, contains, notContains, in, notIn, startsWith,
and endsWith; the Formula list uses the same words as rule rows, such as
"is" for eq and "first available" for coalesce. This is a bounded
expression language, not JavaScript or arbitrary Python. The schema and expression reference
explains type rules and JSON pointers. Validate after changing a reference or condition.
What each step can read
A field set to Data, and the data in a condition row, suggests exactly the data the compiler lets that field read. Suggestions are grouped under Workflow input and under each earlier step's ID with its icon and kind, and a chosen reference shows as a readable token, such as "Input › Customer ID". Each suggestion shows its type, such as "Text" or "Whole number", and notes "may be absent" or "may not match this field" when that applies; mismatches are listed last. The picker starts empty, gives compatible leaf fields priority, and hides raw pointers until Show path. Remove data restores the prior fixed value while you are editing the same field. Rule comparisons can use another data reference on the right side as well as a typed value.
The rules follow the compiler:
- Every field can read
/input. - A step reads the outputs of earlier steps in the same sequence.
- A step inside a branch reads what was readable where its group starts, plus earlier steps in the same branch. It never reads the group itself or steps in a sibling branch.
- A case condition reads only what was readable before the decision.
- A branch output reads what was readable where its group starts, plus the steps of that branch.
- After a group ends, later steps read the group's output, not the steps inside it.
- Nothing after a Fail step on the same path is reachable.
What /steps/<step ID>/output holds depends on the kind:
| Kind | Output |
|---|---|
| Call an action | A value matching the Action's output schema |
| Transform | The result of Value |
| Decision | The output of the case or Otherwise path that ran |
| Parallel | An object with one field per branch name |
| Wait for time | null |
| Wait for signal | The signal payload |
| Human task | decision and data |
| Fail | Nothing; the path ends |
You can still type a path that is not suggested. Studio explains what it sees, for example "Data references start with /input or /steps/<step ID>/output." or "Not in the suggestions. Validate to check this reference." The compiler decides on Validate.
Configure the whole workflow too
Step properties are only part of a complete definition. Open Workflow settings and edit the fields; valid changes are kept automatically. Inputs, Result, Connections, and Limits group these settings:
Schema fields start as compact rows showing the name, type, and whether they are required. Open a row to edit its details, or use its ⋯ menu to move or remove it. Undo restores a removed field.
| Workflow setting | Purpose |
|---|---|
| Name and Version | Identify the definition and the semantic version you intend to publish |
| Input schema | Describes the business data required when starting a run; its preview reads "What people starting a run will see" |
| Output schema | Describes the result returned when the run finishes |
| Connection slots | Maps each slot name to a connector name@version and a required flag |
| Workflow timeout | Optional bound on the workflow's total execution time |
| Workflow output | Selects or constructs that final result |
For a first local example, keep object input/output schemas and a literal empty object output. Add a Wait for time with a short duration, then validate. For an integration example, choose an Action that your project actually publishes and use its schema to build the input. A made-up Action name cannot become executable by drawing it.
Validate and read the diagnostics
Studio checks your workflow while you edit. Shortly after you stop typing, the
local Studio host checks structure, data references, and types; this check never
leaves your computer. Validate compiles against the project catalog when you
are connected and your account has compile; otherwise it runs the same local
check.
The Diagnostics bar at the bottom of the designer shows one status line, with a neutral local-check icon, or a project check, warning, or error icon:
| Status line | Meaning |
|---|---|
| "Not validated yet." | No check has run since the workflow opened |
| "Checking…" | A check is running |
| "Checked locally — Validate to check against the project" | The local check passed. Project actions and connections still need validation. If the session expired or the account lacks compile access, the line explains that instead |
| "1 item needs attention" | A published contract requires an input or connection. The same gap appears on the step; select it to open its field |
| "No problems found." alone | After Validate, a complete project compile found no errors or warnings |
| "No errors, 1 warning." | No errors, but at least one warning |
| "No errors · 4 steps still need an action." | No errors, but some Call an action steps still have no action |
| "No errors found, but the project catalog check didn't finish. Validate again." | The compile was partial |
| "2 errors, 1 warning. Fix the errors to publish." | At least one error |
| "Validate to check your latest changes." or "Validate again to check your workflow." | The result is for an older version, or for another workspace |
| "Studio couldn't check this workflow. Try again." | The check itself failed |
Select Diagnostics to fold or unfold the rows. Each problem row shows
Error or Warning, a plain explanation, and often a hint. Its location,
such as "Step decision-1 · Case 1 condition", is a link that opens that step, or
the workflow settings, with the field focused. Apply suggested edit applies a
compiler suggestion as one undoable change. Details shows the support code,
such as WV-COMP-…, which identifies the rule, and the compiler's own wording
when it differs. Notes are collected under a separate count, such as "2 notes".
On the canvas, a step with problems has a red border and a chip such as
"2 problems".
Publish validates first. With compile, publishing requires a passing
project compile. Without it, the local check must pass, and the platform compiles
the version again when it receives it.
Simulate before publishing
Simulate runs the compiled workflow on the platform without calling any real
system. It needs a connected platform and the simulate permission; otherwise
selecting it shows why under the toolbar. If the workflow does not compile
completely, Studio shows the diagnostics and "Simulation needs a fully compiled
workflow. Fix the problems in the diagnostics first."
- In Simulate this workflow, fill in Workflow input. When the workflow calls actions, an Action results tab, labeled with their count, lists each one by step ID and version; enter the result it should return, or check Skip this action. Edit as JSON and Use the form switch between editors.
- Select Start simulation. Studio sends each result as a mock keyed
node:<step ID>. A skipped action stops the simulation when it is reached, with "The simulation reached an action that has no result to return." - The Simulation panel opens beside the canvas, in the inspector's place. Use Step to advance one step, Continue to run until the next wait or breakpoint, and Start over to return to the setup. The panel shows the status, the simulated time, and the current steps after Now at. On the canvas, the current step is highlighted, the path taken is drawn in color, finished steps show a check, and steps not reached are dimmed; select a step to see its simulated input and output. Editing is paused until you select Stop simulation or close the panel.
- When the run waits, the matching control is the panel's main button:
- For a human task, choose a Decision, fill in Decision data, select Submit decision, then Continue.
- For a signal, choose the Signal, fill in Signal payload, select the send button named after the signal, such as "Send message-received", then Continue.
- For a timer, select a shortcut such as "Finish the wait at pause (1 min)", "Let approval time out (1 h)", or "Let review expire (30 min)", with your own step IDs and times; or enter an Amount, choose a unit, and select Advance.
- Read Step results and the Workflow output when the run finishes. Breakpoints pauses Continue before the steps you check; Activity lists what happened.
The simulation keeps the artifact it started with. After you edit the workflow, select Simulate again to compile the current version. A failed command is shown in the panel with a plain explanation and a support code. Mock-only simulation describes the underlying debugger, its commands, and virtual time.
Check before running
- Resolve any inline invalid fields; valid inspector edits are kept automatically. If you edited Source directly, select its Apply changes first.
- Fix every error in Diagnostics. When you are connected with
compile, Validate until the status line reads "No problems found." - Simulate the routes you care about with realistic action results.
- Save draft and Publish… the version. Then Activate… it: the activation dialog maps Connections and pins Integration versions, Task versions, and People and teams for the environment. Single compatible choices are picked automatically; use Review to inspect them.
- Start run… with schema-valid input and inspect its progress.
The Studio guide explains each lifecycle button. Manage runs and business cases covers several runs per case, business keys, archive and restore, and permanent deletion.
What has been verified
Studio's browser tests (studio/tests/browser/) drive most controls on this
page with pointer and keyboard input against a mocked platform API, and the unit
tests in studio/tests/ cover the logic behind them, such as action search,
slot choice, data scoping, and node summaries. In the browser tests, the local
authoring calls behind the API action builder run the repository's own Python
code. An opt-in browser test also ran the New API action builder against a
local platform: the call it built ran to succeeded. The
Studio guide describes that test.
Next steps
- Save, publish, activate, and run the workflow you configured.
- Call a REST API without code to create the Actions that Call an action uses.
- Add human approvals: assignment bindings, claims, and decisions behind the Human task step.
- Read the schema and expression reference for the full type and JSON pointer rules.